Family Friends & Farm

Marvelous Mint Summer Salad

repost

At this time of year, my gardens are full of fresh, aromatic mint, and I’m never quite sure what to do with all of it!

I enjoy walking next to the garden beds it’s spilling out of, brushing up against the leaves, and breathing deeply of the scent they release, but other than that, and using the tall straight spears in flower bouquets and arrangements, I’m at a bit of a loss.

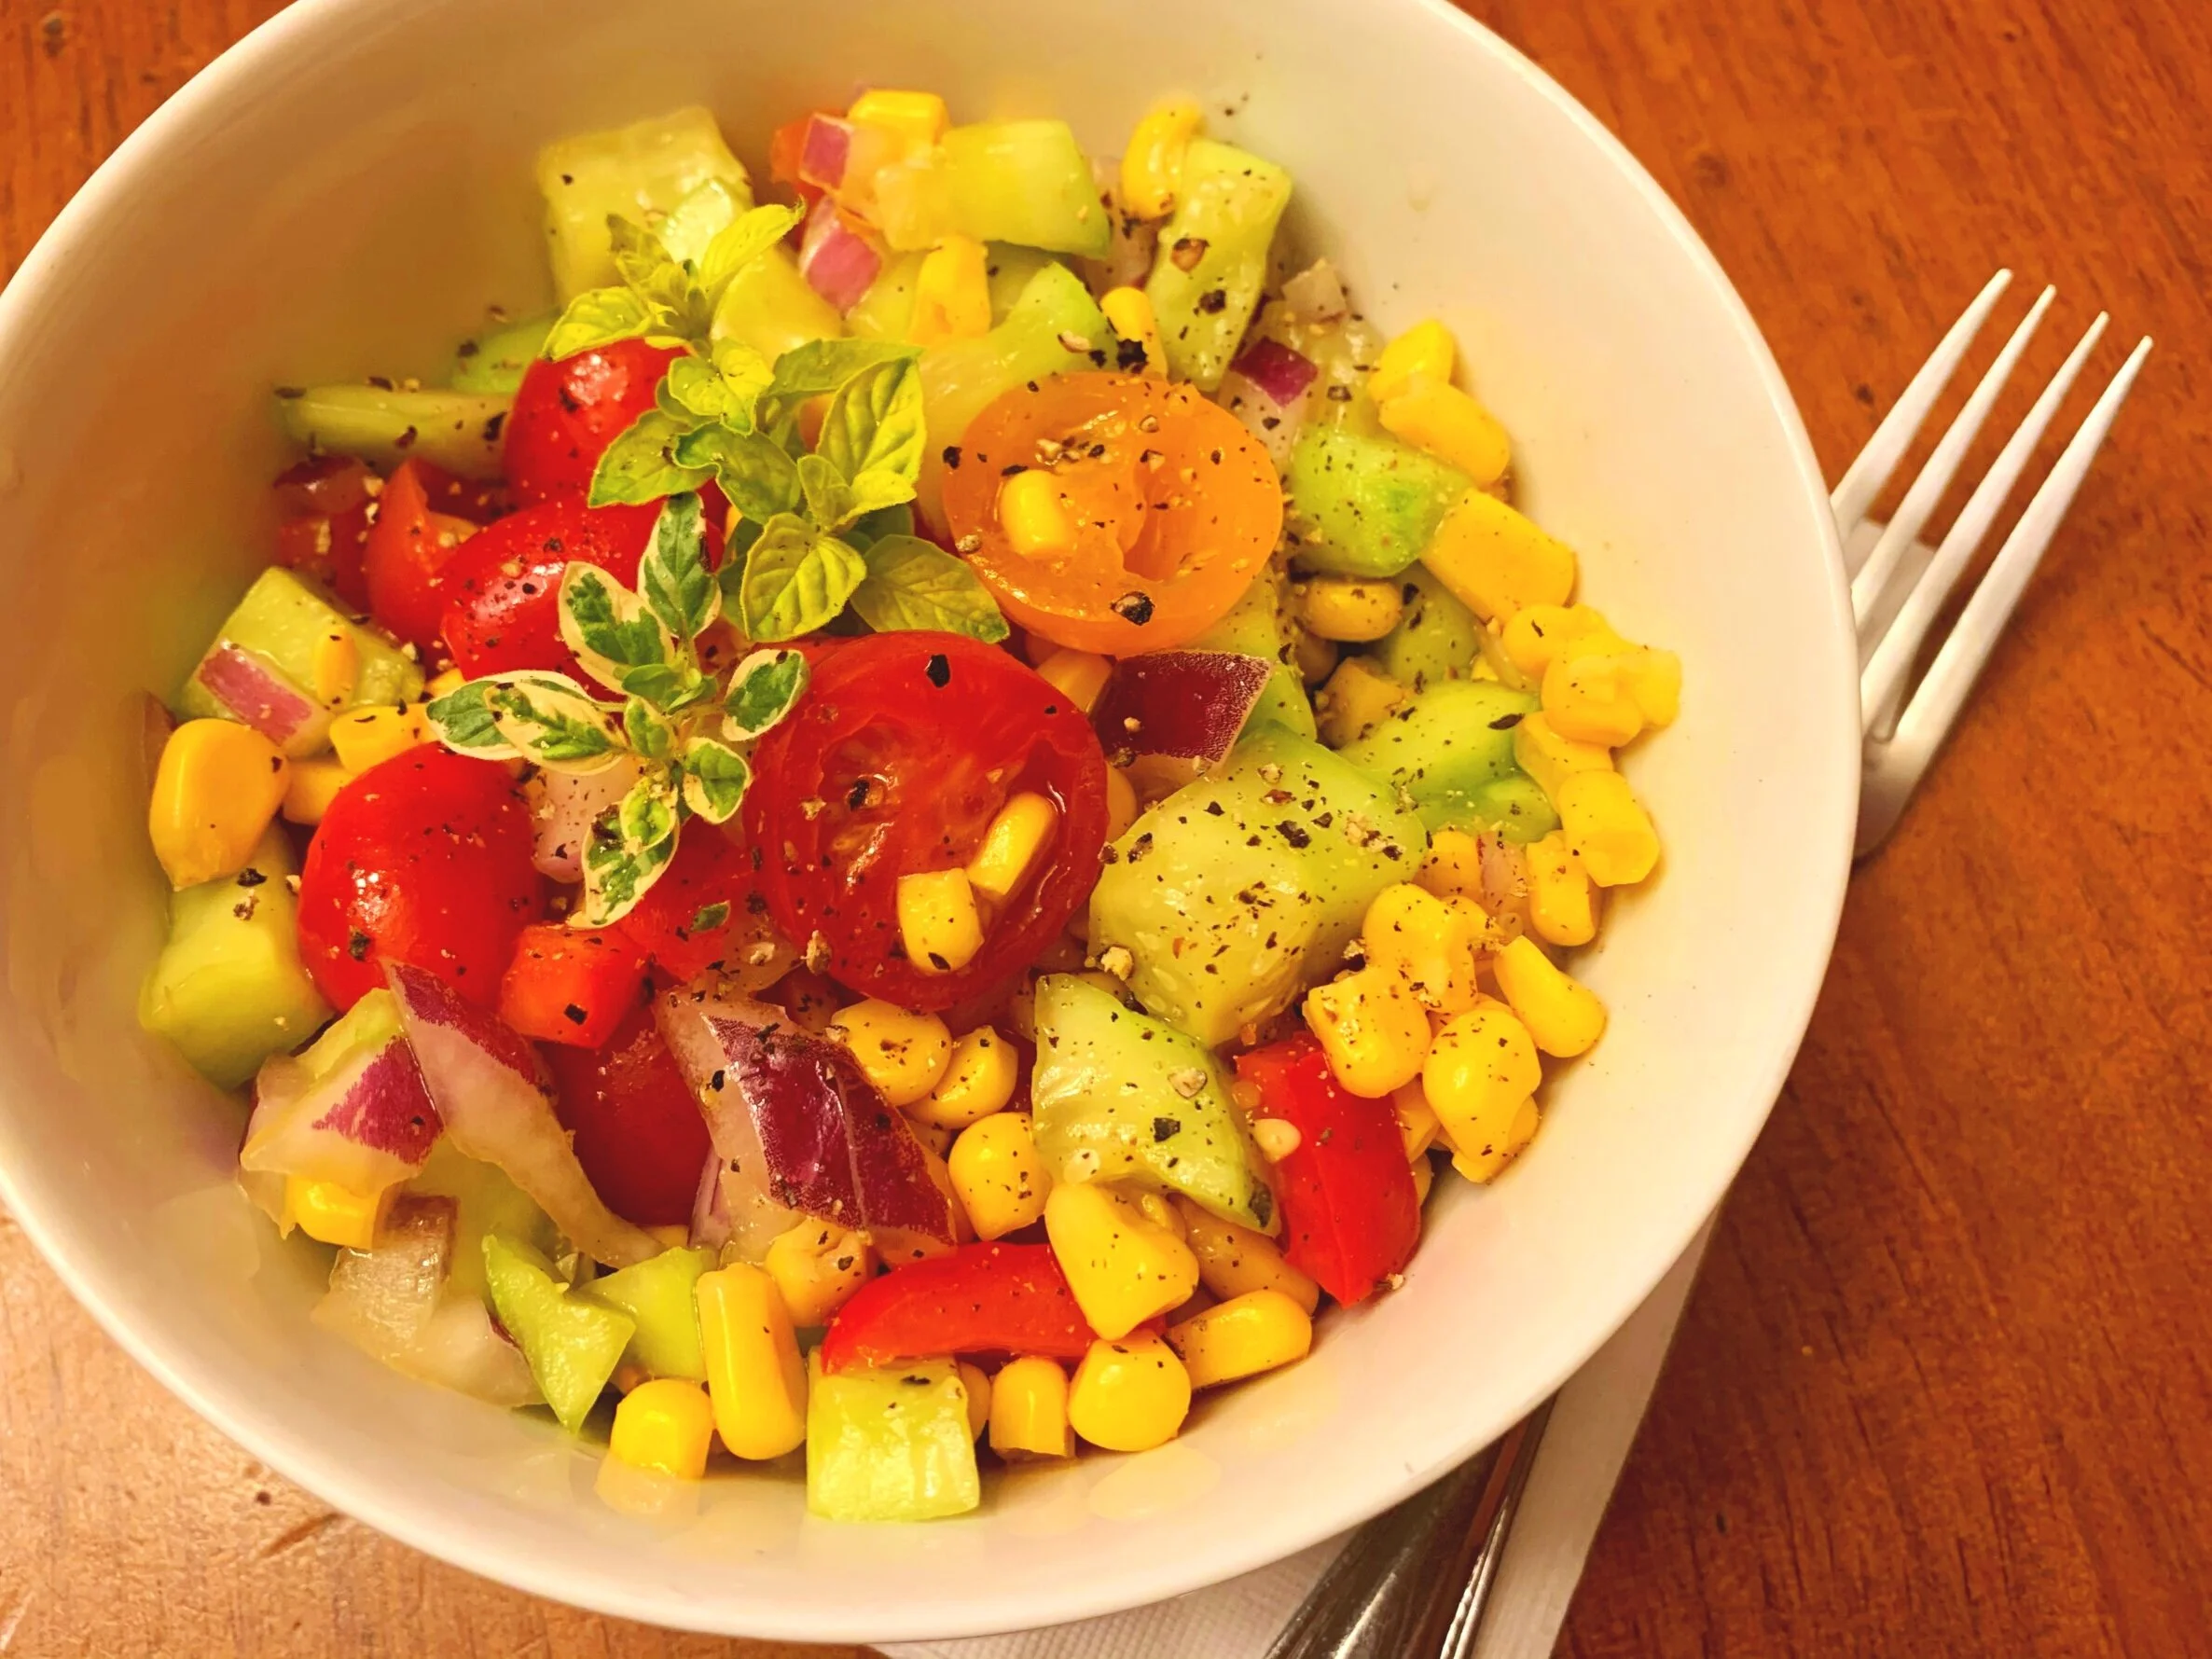
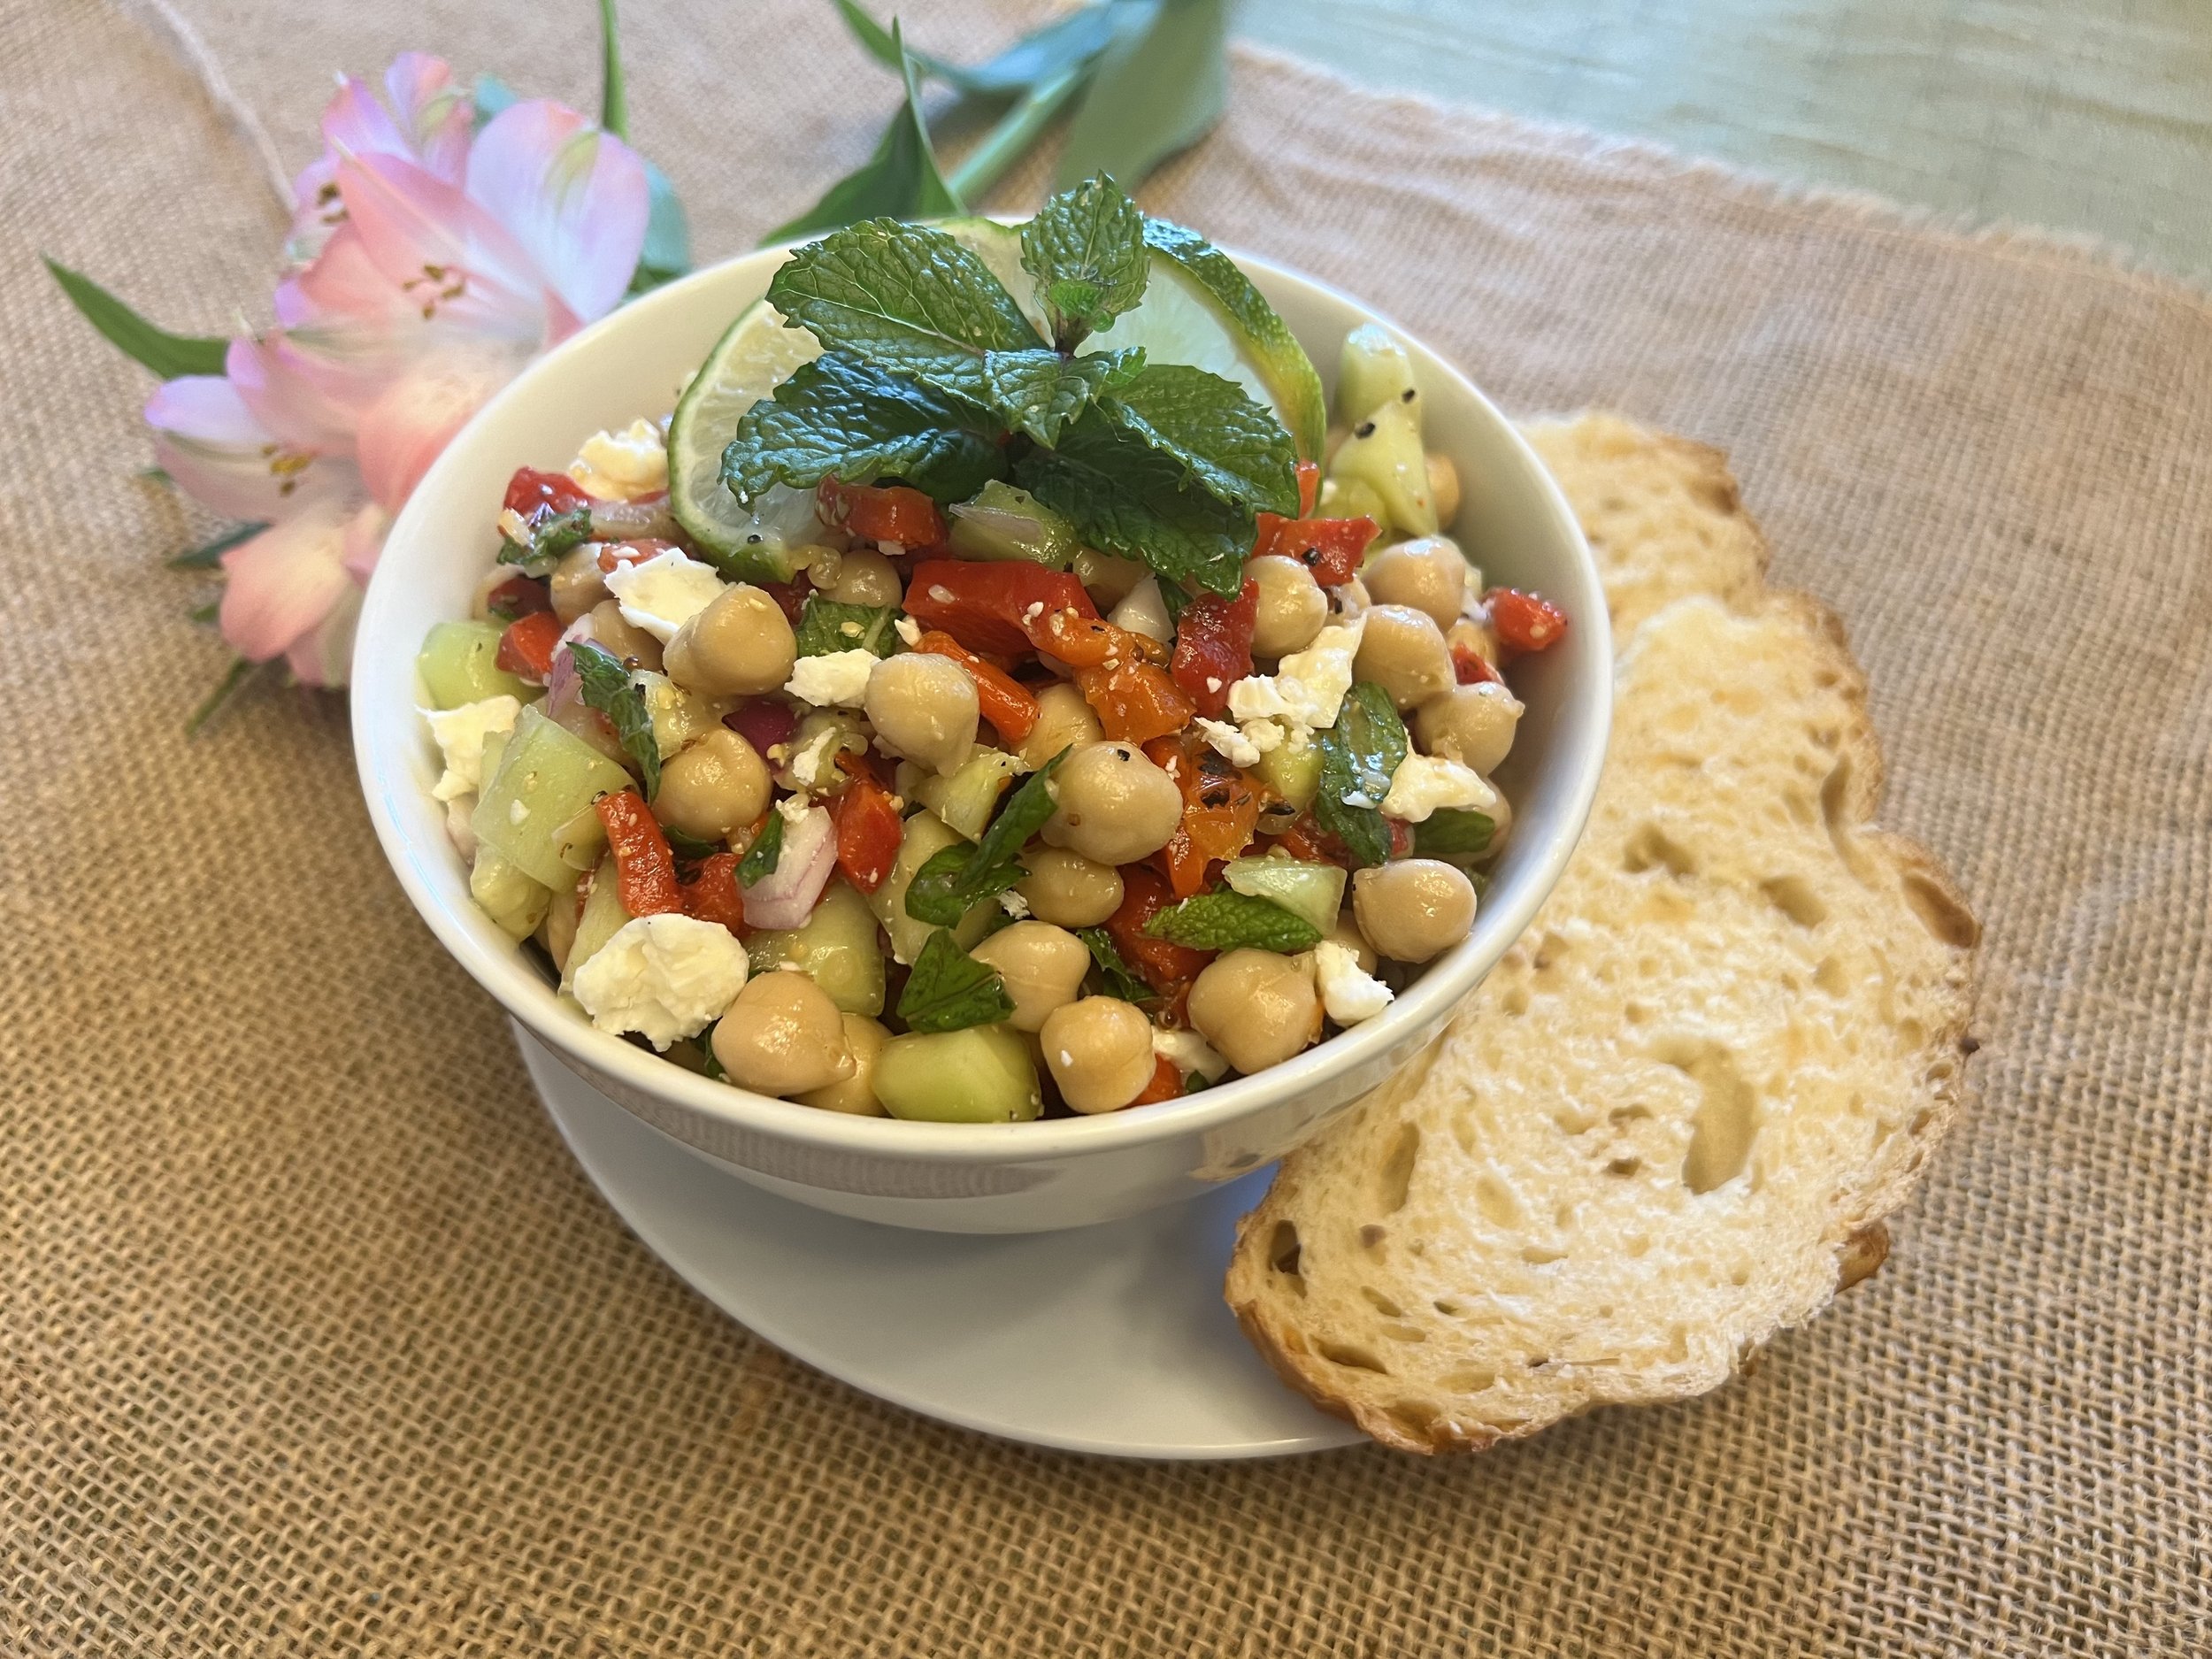
Enter this fantastic garbanzo summer salad!

The base is chickpeas (though I’m sure a white bean would work equally well) and another winning ingredient is roasted bell peppers—the variety you’ll find on store shelved in jars with olive oil—there’s some cucumber thrown in for crunch, some onion for zip, and feta cheese that adds to the texture… But the star of the show is fresh mint!

I encourage you, as I often do, to use the recipe as a bit of a guide, adding, subtracting, and substituting with whatever you have on hand or with whatever sounds good to you. I think diced tomatoes would be yummy, and I was even wishing I had some kumquats on hand to slice into it. (Oh, and how ‘bout some sunflower seeds added just before serving?)

Whatever you toss in there, be generous with the mint, and make it up ahead of time, because it needs a few hours minimum in the fridge to allow the flavors to marry and the mint leaves to soften a bit.

Ingredients:

ingredients

  • 2 cans chickpeas, rinsed and drained

  • 2 cups canned roasted bell peppers, chopped

  • 1 cup peeled cucumber, diced (same size as chickpeas)

  • 1/2 cup diced red onion

  • 1/2 cup fresh mint leaves, washed, and diced

  • 1/2 cup crumbled feta cheese

Dressing:

  • 1/4 cup lime juice

  • 2 Tablespoons honey

  • 2 Tablespoons mustard

  • 1/4 cup olive oil

  • Salt and Pepper to taste

Directions:

  1. In large bowl combine all salad ingredients, except for feta cheese, folding to mix well.

  2. In a small bowl, mix lime juice, honey, and mustard, then add 2-3 drops of the olive oil, and when well incorporated, add remaining oil in a steady stream whilst mixing. Add salt and pepper to taste.

  3. Pour dressing over salad, folding again, then top generously with feta cheese.

Fresh Corn, Tomato, & Cucumber Salad

IMG_1383.jpeg

Repost

This colorful salad recently appeared at a family gathering.

Amongst delicious, but not the healthiest choices, (yes, I’m talking to you, bratwurst, Doritos, and potato salad!) it was a fresh, welcome addition to the early summer banquet table.

It’s easy to mix together, and you can adapt it to whatever you’ve got in the fridge.

Use the olive oil and vinegar you’ve got around. Regular, extra-virgin, rice, white wine, red wine, whatever. Try the recipe’s “secret ingredient” of Montreal Steak Seasoning (a dry mixture of salt, pepper, paprika, garlic, and who knows what) or substitute your favorite seasoning blend. Add avocado, rinsed and drained black beans, scallions if you don’t have red onion, mozzarella cheese, or feta crumbles… Add sunflower or roasted pumpkin seeds just before serving if that tickles your fancy. Your salad, your way.

Here’s the recipe for the one pictured!

Ingredients:

Facetune_16-06-2021-15-52-06.JPG
  • 1/4 cup olive oil 

  • 3 tablespoons rice vinegar

  • 3 generous tablespoons McCormick’s Montreal Steak Seasoning (or salt and freshly ground black pepper to taste)

  • 2 cans of whole kernel corn, drained, or 6 ears fresh corn cooked, cooled, and cut from cob (about 4 cups)

  • 2 cups grape or cherry tomatoes, halved

  • 2 large cucumbers, peeled, and diced

  • 1 large red bell pepper, seeds removed, diced

  • 1/2 large red onion, diced


Directions:

  1. Whisk together the oil, vinegar, and seasonings in a small bowl.

  2. Combine corn, tomatoes, cucumber, bell pepper, and red onion in a large bowl.

  3. Pour the vinaigrette over the veggies and toss to coat.

  4. Let stand for about 10-15 minutes then give a taste test and adjust seasonings if needed, adding salt, pepper, garlic or others (Italian blend) to your likings.

  5. Serve.

Fresh, light, and healthfully delicious. Go ahead and indulge in the other picnic favorites, but leave a little room on that flimsy paper plate for some of this goodness!

Perfect for your Father’s Day, 4th of July, or any summer gathering.

Delilah Logo.png


Lemony Rhubarb Scones

Start off your weekend with these oh-so-delicious Lemony Rhubarb Scones!

My gardens are lush with rhubarb this time of year, and I’m always looking for new ways to use the tart, beautiful stalks. Pies, alone or with other fruits like strawberries and blueberries, are of course a favorite, and I can’t tell you how much rhubarb sauce we go through topping pancakes, waffles, and ice cream! But I’d never thought about using them in scones until a friend recommended this recipe to me.

These two tarts - lemon and rhubard - are tamed with a sweet sugar glaze and the combination is melt-in-your-mouth, delish!

This is a basic scone recipe, which as you know, comes together pretty quickly because it has baking powder for leavening. All you have to do is add the lemon’s zest and juice and the chopped rhubarb to take them from Ho-Hum to Oh-Yum!

Ingredients:

  • 2 cups all-purpose flour

  • 1/3 cup granulated sugar

  • 1 tablespoon baking powder

  • 1/2 teaspoon salt

  • Zest of 1 lemon

  • 1/2 cup unsalted butter, frozen and grated

  • 1/2 cup chopped fresh rhubarb

  • 3/4 cup heavy cream

  • 1 teaspoon vanilla extract

  • 1 tablespoon lemon juice

  • 1 egg (for egg wash)

Directions:

  1. In a large bowl, whisk together dry ingredients: flour, sugar, baking powder, salt, and lemon zest.

  2. Add grated butter and cut into dry ingredients with a pastry cutter or two forks until mixture resembles coarse crumbs.

  3. Add chopped rhubarb and stir.

  4. In small bowl, mix wet ingredients; cream, vanilla, and lemon juice. Pour into the dry mixture and stir until just combined.

  5. Turn dough onto a lightly floured surface, knead a few times, and shape into disk approximately 1-inch thick.

  6. Refrigerate for at least 15 minutes - or overnight if you want warm scones in the morning!

  7. Preheat oven to 400 degrees as dough is chilling and prepare a baking sheet with a large piece of parchment paper.

  8. Cut chilled dough into 8 wedges and place them on prepared baking sheet.

  9. Brush the tops with beaten egg

  10. Bake for 20 minutes, until golden brown and no longer wet inside.

  11. Cool on wire rack then drizzle with glaze.

Glaze:

  • 1 cup powdered sugar

  • 1/2 teaspoon vanilla extract

  • 3 Tablespoons heavy cream or milk

  1. Combine sugar and cream/milk, mixing well until thick and smooth. Add more sugar if too thin, or more cream/milk if too thick. Drizzle over cooled scones.

Rhubarb Compote

It’s rhubarb season!

These prehistoric-looking plants come into their full glory in late spring and if you are lucky (or unlucky) enough to have some in your garden, or your neighbor does, after the first few delicious pies and crumbles you begin to wonder… “What in the world do I do with it all?!”

This is about the time you find yourself offloading onto first grateful friends and then the unsuspecting masses - leaving bundles of the long red stems on porches and car hoods!

If you’re already tiring of sweet desserts here’s a recipe you may appreciate; Rhubarb Compote.

It is especially timely with Father’s Day around the corner as it adds something truly special to a masculine meal of savory pork chops pulled off the new grill he may have spent the day assembling!

The following recipe calls for honey, but it doesn’t make it sweet enough for my family’s liking. Feel free to add sugar or brown sugar to taste and also play with whatever ingredients you have on hand!

Sometimes diced green red or green bell pepper makes a tasty addition, as does a dash or two of soy sauce. It’s finding the right balance of sweet and savory that appeals to YOUR palate… so don’t be afraid to make it your own!

Ingredients:

  • 2 Tablespoons +/- olive oil

• 1/2 small onion, (red or sweet) diced

• 1 clove minced garlic

• 4 large stalks rhubarb, cut into 1/4-inch pieces

• Juice of 1 large orange

• 1 teaspoon grated fresh ginger

• 1/4 cup of honey

• 1 teaspoon salt

Directions:

  1. In a medium saucepan, heat the olive oil over medium-high. Add the onion, sautéing until tender and translucent. Add the garlic and cook for just another minute or two more.

  2. Lower the heat and add the rhubarb pieces, the orange juice, and freshly grated ginger. Combine well, and cook, stirring occasionally until the rhubarb is soft and tender. Do not cook so long as to turn the rhubarb to mush, you want some soft chunks to remain.

  3. Remove from heat. Add the honey and salt.

  4. Give it a taste test. Sweet enough? If not, add more honey or some brown sugar. Needs balance? Add another pinch of salt.

  5. Pull your chops from the grill and top generously with compote. Garnish with a spring of rosemary if you have it for a lovely presentation.

Bon Appetite, and Happy Father’s Day!

Bon Appetite, and Happy Father’s Day!

Now Playing | Body By Jake Radio

As the former Mayor of the Palisades, and someone who lost his home in the devastating Palisades Fire, Jake Steinfeld, AKA “Body by Jake” has been encouraging friends and neighbors to have faith and persevere with his eternally optimistic message; “Don’t Quit!”

He’d lived in his home for 30 years before the fires took everything, and he’s one of the first to scrape his lot and start rebuilding. No surprise, as Jake is known as someone who’s done a lot of ‘firsts’.

Now the trailblazing fitness icon is bringing, DON’T QUIT to the airwaves withBody by Jake Radio,” the first-ever digital radio channel designed to fuel mind and body.

The innovator who revolutionized fitness media by creating the first exercise segments on cable tv (CNN), the first 24-hour fitness network (FitTV), the first on-demand fitness television service (ExerciseTV), and the first exercise playlist, has partnered with HeartMedia and Universal Music Enterprises (UMe), to make the first-ever 24-hour digital radio channel. 

A dynamic mix of music, mindset and motivation, Body by Jake Radio will feature host Jake Steinfeld, and other notable personalities in the fitness and mental health worlds, offering empowering messages, fitness, lifestyle, and longevity tips, alongside an eclectic range of uplifting and fitting music to keep listeners motivated and feeling their best all day. 

The channel is designed to energize listeners in the morning, sustain them throughout the afternoon, and help them unwind in the evening through a diverse mix of music and specialty programming tailored for different parts of the day.

In need of a little motivation? Don’t Quit! Body by Jake Radio will provide it.

Carrot Slaw

Reprint

Putting dinner on the table during the darker months of the year always seems to be a rushed endeavor.

In the summer months when the sun is high well into the evening, and everyone is outside playing, I can move about the kitchen freely and holler for my family to come in when I’m ready for them. But now, it’s dark so soon after the kids get home from school that they are inside (often at the kitchen table doing their homework,) when it’s time to prepare the evening meal. The older ones often have things they need to hurry off to as soon as dinner is over and the younger ones need baths and bedtime routines. Can anyone relate?

I’ve got a few hacks to get a balanced meal on the table in a jiffy, and one of them is my mom’s carrot slaw.

Ingredients:

  • 3 large carrots, peeled and grated (about 3 cups)

  • 1 teaspoon apple cider vinegar

  • 1/2 cup raisins or dried cranberries (craisins)

  • 1/2 cup mayonnaise

  • 1 teaspoon salt

  • 1 Tablespoon sugar

  • (optional) chopped walnuts, pecans, or sunflower seeds

Directions:

  1. Peel and grate carrots,

  2. Place in large bowl and toss with vinegar.

  3. Add remaining ingredients and mix well.

  4. Serve immediately or refrigerate.

This comes together in a jiffy with ingredients most of us have on hand. It’s colorful and textural, a few things kids always seem to like, and it’s tasty!

Toss it together for a perfect pairing to roast beef or a roasted chicken, pork chops or round steak. (My folks used to tell me eating carrots would help me see in the dark… maybe that will help entice a little that is hesitant to try new foods.)

Enjoy!

Spring Craft | "Bunny Bait"

Reprinted from 2023

Here’s a clever little spring craft using wood shims, some glue, paint, and a little faux greenery.

Make yourself a cute bundle of carrots that won’t go bad even if you forget to put them in the root cellar come fall!

Display them on your table - or wherever you think they may work to attract an Easter Bunny delivering baskets full of decorated eggs, chocolate candies, and marshmallow peeps!

Supplies:

  • 1 package of wood shims (12 count)

  • White (school) glue, wood glue, or hot glue

  • Rubber bands

  • Craft paint

  • Faux greenery

  • 3 small nails or tacks

  • Twine or Ribbon


The beauty of this craft is that after you get your shims and greenery, you can use whatever you have on hand to pull the project together. The crafter that shared this with me says she had everything (including the shims) in her craft or home supplies but encourages everyone to put their own spin on things. Pastel, polka dot, or striped carrots? Yes! Make them your own!

Steps:

  1. Begin by gluing four (4) shims together to make a “carrot” shape - wide portion of the shim at one end, narrow portion at the other. If you’re using a liquid glue, bind your carrot together with rubber bands or other binding until it dries. Repeat using all 12 shims to make 3 carrots.

  2. Paint your carrots. Follow your own style sense here. Make ‘em traditional, modern, or whimsical. You’re in charge.

  3. Add some carrot “tops”. One Dollar Tree sprig of greenery was sufficient for the 3 carrots pictured. Maybe you’d like to use dried grasses or other foliage? Again, you’re the boss.

  4. Attached the tops either with hot glue, a short nail, or a long tack - however you can get them to stay in place.

  5. Tie some twine or ribbon at the top if you’d like. (If you don’t want to, you don’t have to!)

  6. Display and wait for Easter morning to see if Peter Cottontail took the bait!

I hope you enjoy this craft. Send me photos of your finished product to D@Delilah.com, I’d love to see what you’ve come up with!

Happy Easter, Happy Spring, Happy, Happy Everything!


Cinnamon-Applesauce Hearts (Repost)

Facetune_02-02-2021-22-07-02.JPG

Republished from 2/21

Years ago, my mom delivered a Valentine's package with a deliciously scented heart ornament dangling from the bow.

It was a cinnamon heart, strung with a satin ribbon - and even after the scent had gone, it hung from a kitchen cabinet handle for many more years delighting me with fond memories.

This old recipe, requiring only two ingredients - ground cinnamon and applesauce - might traditionally be used to make Christmas ornaments, but since my mom pressed it into heart shapes, in my mind, it's best suited to Valentine decor.

You won’t believe the incredible cinnamon smell that fills your home while these are baking - and how lovely it will be for days (weeks) to come when you walk into a room where one of them is on display!

Cinnamon can be expensive if purchased in those tiny containers at the grocery, but if you have a big-box store like Costco, WinCo or Cash & Carry nearby, you can pick it up a large container relatively inexpensively. Increase or decrease the recipe depending on how many hearts you want to make, using a 1:1 ratio.

Ingredients:
(makes about a dozen cookie cutter hearts)

Screen Shot 2021-02-02 at 7.57.11 PM.png
  • 1 cup Cinnamon

  • 1 cup Applesauce

  • Thin ribbon or twine

Instructions:

  1. Thoroughly mix the cinnamon and applesauce together in bowl. It should have a thick, paste-like consistency and hold together well - not too dry, not too wet.

  2. Place between two pieces of parchment or waxed paper, and roll out to about a 1/4 inch thickness. It will break if too thin, and will take longer to bake if too thick.

  3. Take the top layer of paper off and use cookie cutters to cut into shape.

  4. Use toothpicks to decorate and a straw to make the hole for hanging.

  5. Move hearts onto a cookie sheet.

  6. Bake at 200 degrees for about two and a half hours, until they feel dry and hard.

  7. Once cooled, thread ribbon or twine through the hole and make a loop.

Dangle from a Valentine’s package, gift a grandparent, teacher, friend, or hang in your home for some Valentine’s love, some winter cheer, and a fantastic cinnamon scent!

And yes, go ahead and use the recipe during other seasons and cut out other shapes - acorns and leaves in the fall, snowmen and snowflakes for your Christmas tree… it’s all fair game!

Delilah Logo.png


Hearts a-Flutter | Valentine Craft

REPOST:

Saw the cutest little craft the other day, and had to share it with you! I’m sure you’ll be a fan, just as I am. It’s sooo simple and has my heart all a-flutter.

Make yourself some of these adorable little accordion hearts, and hang them wherever you want to spread a little love!

It all starts with a simple circle of paper. The ones in this example are made using an 8.5” and a 6” wide bowl for templates. And old tattered book of children’s music provided some of the paper, and craft paper was used for the rest.

Materials needed:

  • Paper

  • Pen

  • Scissors

  • Scotch Tape

  • Twine or Ribbon for hanging

Instructions:

  • Draw a circle on a sheet of paper and cut out.

  • Fold the circle in half, then unfold. Fold the outside edges inward to the center fold, and crease.

  • Now fold those outside edges in to the center once and twice again and crease. Unfold. You should end up with a circle that has uniform creases from one side to the other.

  • Beginning at one side, fold along the creases in a back and forth, accordian style until the entire circle has been folded.

  • Now fold in half, pinching at the fold to form pointed bottom, and fanning the tops to form a heart shape.

  • Tape the middle of the accordion together where it meets, toward the bottom, preserving the top ridges .

  • Include a looped piece of twine or ribbon under the tape for hanging.

Happy crafting! And Happy Valentine’s Day!

Tidying Up | January Book Club

You know by listening to my radio show that I tell stories on myself… One of the most common I share is how I have a simply awful time keeping myself organized! I’m often surrounded by chaos and clutter, and the moment I decide I need to do something about it, I’ll catch something shiny in my peripheral vision, and my best intentions fly out the window!

That’s why I was drawn to Tidying Up, this month’s Book Club choice.

It’s a fool-proof, room-by-room guide to decluttering your life and creating the peaceful sanctuary you desire, available in hardback, audiobook and Ebook. The 100 organizational tricks come from sisters, Ea Fuqua and Meg DeLong, cofounders of The Tidy Home Nashville.

Tidying Up promises joy and peace are just around the corner. In fact, they can be around every corner of your home, from the kitchen to the living room to that dangerously dark section of the laundry room.

In this handy guide, Meg and Ea, offer us a shame-free, straightforward approach to embracing organization as soul care.

Whether you have a studio apartment or an overflowing farmhouse like me, Tidying Up will help you:

  • Put into practice 100 strategies—organized room by room—that make an immediate difference

  • Create sustainable systems that free you rather than bog you down

  • Tailor your living space to complement your personal style and purpose

  • Discover how regaining authority over your stuff invites your brain and body to rest

These two sisters have seen it all and have helped countless clients tackle their living spaces and create peaceful and practical homes—so they know what really works and lasts! This book is a must for anyone navigating life with family members, roommates, or even solo-dwellers looking to maximize their space!

With fun, colorful design features throughout, Tidying Up is a perfect gift for for anyone making a fresh move into a new home, apartment, dorm room, or people you know (like me!) that struggle with “stuff”.

Get a copy for yourself and all those folks in your life that have a hard time keeping their laundry done and their ducks in a row!

Order: Tidying Up

Pumpkin Spiced Latte’s from Cheri’s HazelCream

It’s the season for sipping…

And though I’m usually a tea girl, these Pumpkin Spiced Latte’s from Cheri’s HazelCream have converted me, at least as long as the frost in on the pumpkin!

So rich, so pumpkin spicey, so creamy, so delicious…

Total time: 5 minutes

Ingredients:

  • 2 shots espresso or 1/2 cup strong coffee

  • 2 cups Cheri’s HazelCream, made as ½ & ½ (24 ounces water)

  • 2 Tbs pumpkin puree

  • 2 Tbs maple syrup

  • 1 Tbs vanilla extract

  • 1 tsp pumpkin pie spice

  • Dairy-free whipped topping & extra spice (optional)

Directions:

  1. Make Cheri’s HazelCream, mix as ½ & ½ (24 oz water).

  2. Combine Cheri’s HazelCream, pumpkin, and maple syrup in a sauce pan. Slowly heat and whisk, do not boil.

  3. Turn off heat. Add espresso, vanilla, and spice. Whisk.

  4. Taste and adjust for sweetness and spice.

  5. Makes 2 mugs of Pumpkin Spiced Latte.

  6. Optional: Top with dairy-free whipped cream and a sprinkle of spice.

Dear Friend | November Book Club

“Dear Friend: Daily Love Notes for Contemplation, Connection, and Clarity” is a lovely book by Michelle Maros, with a forward by her mother and podcasting partner, Barb Schmidt.

In Dear Friend, Michelle writes to you with the warmth and wisdom of a trusted friend, offering daily, bite-sized, loving notes that encourage connection, resilience, and true self-care.

This book will offer you a daily reprieve when you feel burned out, beaten down, or overwhelmed by the strains and stresses of modern life.

Michelle is the founder of “Peaceful Mind Peaceful Life,”, a nonprofit committed to enhancing mental health and fostering inner peace globally, and cohost of the widely loved podcast, “Life Happens with Barb & Michelle.”

The heart of Dear Friend began in the quiet mornings Michelle shared with her mom. Every day, they would sit together, reading affirmations or passages from Barb’s beloved books.

These small rituals—simple but powerful—set the tone for each day, grounding them in gratitude, hope, and love. Over time, these moments became a cornerstone of Michelle’s life, showing her the deep, transformative power of starting each day with intention, kindness, and a connection to what truly matters.

Dear Friend is an invitation for readers to feel the same support and connection Michelle found in those quiet moments, as they navigate their own paths with love and purpose; with 365 profound, heartfelt reflections offering inspiration as you navigate the ebbs and flows of life.

Here, you'll find encouragement to reconnect with your foundation and rebuild your strength from within. Because when you cultivate a deep connection from within yourself, you are equipped to manage all that comes your way.

It’s an absolutely beautiful book, with a gorgeous hard cover, a unique size, and a heft to it I appreciate. I’m going to be ordering multiple copies to give away for Christmas, and will keep a few on hand for birthdays, Mother’s Day, other special occasions - and of course one for myself! I suggest you do the same.

ORDER: Dear Friend

Does It Work???

For those who know us, you know my husband Paul cares about “function”.

Does something work?

A ten penny nail pounded in the wall next to the door; perfect key holder. Wading boots for fishing hanging on the living room wall; easy to get to if the fish are biting. He has never purchased or hung a piece of original art work in his 72 years of living…

And when I create my works of art? His usual observation is “cute.”

Rich, layered colors, deep textures, whimsical style, repeating themes… These nuances are lost on him but my soul craves creativity. I’m not so concerned about whether or not something works well, as I am does it look good?!? Does it please the eye? Does it touch the soul? I want BEAUTY! I want layers of beauty!

However, he was pleased with the new circular gathering space I designed, as it’s low maintenance and functional. I planned ahead and planted in the spring, so the landscaping is already established (“instant gratification” for him.) The level surface makes it easy for him to navigate (he’s lost some mobility), and the benches are the perfect height. In other words, it works.

Today we both got to enjoy the things we love at our ranch.

Christmas Jars Cookbook | October Book Club

The book “Christmas Jars” by Jason F. Wright, is an all-time favorite of mine! If you’ve not read it… A young journalist named Hope starts digging around to discover the truth about a local tradition of anonymously gifting money-filled jars to people in need during the holidays. When she learns who the family is that started it all, she’s faced with the dilemma of publishing their names or burying the story. A beautifully written book about faith, family, and the power of giving, it started a national phenomenon that has touched the lives of millions of people.  If you don’t have a copy, get one!

And now, Jason and his wife, Kodi Wright, are giving us a new gift of warmth and kindness this holiday season—one jar, one recipe, one story at a time, with “Christmas Jars Cookbook”.

Inspired by the heartwarming tradition of Christmas Jars, Jason and Kodi have created a unique cookbook that celebrates the joy of giving through delicious homemade recipes.

But it includes more than just food—it's also filled with real-life stories from people who have given or received cash-filled Christmas Jars, fun and creative craft ideas, and the sharing of other much-loved holiday traditions that you might be inspired to adopt.

With humorous titles like Rudolph's Maple Carrot Cupcakes, Kason's Caramel Apple Cheesecake Dip, and Christmas Movie Caramel Corn, the recipes are designed to be lovingly prepared and given away to friends, family, and neighbors, much like the tradition behind the movement.

Whether it's a jar of Sift and Gift Hot Chocolate mix, a batch of Ginger Cream Cookies, or a heartfelt craft like Hope's Mini Decorative Wreath, the ideas will help you spread love and holiday spirit.

Perfect for the giving season, Christmas Jars Cookbook reminds us that the best gifts come from the heart—and sometimes, from the kitchen.

Get yourself a copy, and pick up a few more for gift giving!
Christmas Jars Cookbook

Rockin' Around the Christmas Tree | Book Release

Back in 1958, sock hops were the rage, aluminum Christmas trees were the future, and 13-year-old singer Brenda Lee was recording the soon-to-be-classic "Rockin' Around the Christmas Tree."

Now we have a delightful gift book—perfect for stockings, coffee tables, or under the tree—celebrating the song’s record-breaking revived popularity, with ideas for holiday parties, innovative decorations, cozy meals, and more.

Get the most out of your Yuletide celebrations and let the Christmas spirit ring with this full-color festive handbook to all things holiday! You’ll rock around your own Christmas tree this season with the beloved, nostalgic #1 chart-topping song as your guide to a host of holiday fun, from recipes and crafts to party games, decor ideas, and more!

At the Christmas party hop or hanging the mistletoe where you can see, you will get a sentimental feeling when you:

  • Choose from over 30 recipes for food and cocktails such as pull-apart pastry puffs, Christmas morning casserole, ornament and gingerbread cookies, and a holly jolly espresso martini

  • Welcome others into the celebration with fun games, party ideas, and a soundtrack for all your Christmas gatherings

  • Relive your favorite Christmas memories as you dip into nostalgia and learn the fascinating history behind familiar traditions, such as hanging mistletoe, watching Christmas movies, or decorating cookies

  • Make your home merry and bright with creative ways to decorate your door, set your table, and wrap your gifts

  • Enjoy insights and stories from the song’s origins and legacy of singer Brenda Lee and songwriter Johnny Marks

Rockin' Around the Christmas Tree gives you all the feels, fun, and festivities you love about the season. It’s an ideal gift for a family member or friend who goes all-out for the Christmas season and for yourself, because maybe YOU are that person!

Rock on in the new old-fashioned way!
Purchase
Rockin' Around the Christmas Tree

Cherry Tomato Confit | Late Summer Delight!

First off, I had no idea what confit was, or how to pronounce it. I’d seen “Duck Confit” on menus but had no inclination to try it. But a friend served up this little side at a baby shower, and I was surprised when she told me it was Cherry Tomato Confit. Um, what???

Apparently confit (pronounced cone-fee) isn’t a someTHING, but a someHOW. It’s a French term that means “to cook slowly in fat”. I still don’t have a clue what that means for our fine feathered friends, but thankfully I now know what it means for the abundance of cherry tomatoes I have in the garden!

By roasting tomatoes in extra virgin olive oil, with the addition of garlic, salt, pepper and herbs, at 250 degrees for an hour or more, what you get is a savory topping that smells like Nona’s kitchen and tastes like a Tuscan summer.

You can use it as a topping for crostini or crackers, like my friend did, as a pairing with hummus and other dips, toss it with pasta for a main dish, or spoon some over your protein, be it chicken or beef.

Ingredients:

  • 2 cups of cherry tomatoes +/-

  • 1 - 1 1/2 cups of extra virgin olive oil +/-

  • 1 head of garlic, sliced in half horizontally

  • Zest of one lemon

  • Salt and Pepper, to taste

  • Herbs of choice, to taste. (oregano, sage, basil and rosemary were in the garden - you can use dried herbs)

Directions:

  1. Preheat oven to 250 degrees F

  2. Place tomatoes in single layer in shallow baking dish, add enough olive oil so the tomatoes are at least half-way covered.

  3. Remove loose skin from garlic halves, then place, cut side up, in between tomatoes.

  4. Add lemon zest, salt, pepper, and herbs.

  5. Bake for one to two hours (depends on how large the tomatoes are), until tomatoes and garlic have softened. Do not cook so long that tomatoes turn to mush, they should still hold their shape.

  6. Remove from oven.

  7. When cool enough to handle, the garlic should slide right out of the husk. Recombine with tomatoes and serve warm or place in clean jars with enough of the oil to cover all tomatoes and refrigerate for up to 2 weeks.

  8. Don’t even think of discarding the oil if there is some remaining once you’ve transfered to storage container. It’s so flavor packed! Use it in salads or to saute’ up some garden veggies!

Enjoy! (Or rather, bon appetit!. Or maybe even, "a tavola")

30 Minute Meals with Six Sisters Stuff | September Book Club

As summer winds down, school starts, and our lives take on a more steady rhythm and routine, “What’s for dinner?” becomes an all too familiar refrain. A sandwich or hot dog before heading to baseball practice isn’t going to do the trick anymore…

"30 Minute Meals" by Six Sisters' Stuff to the rescue.

It features over 100 family-friendly recipes like Chicken Street Tacos, Instant Pot Butter Chicken, and Air Fryer French Bread Pizza. All of which can be put together and ready to eat in about 30 minutes. (Hallelujah!)

No fancy ingredients that require shopping in specialty markets and no complicated instructions that need a a culinary arts degree to decipher.

Everything is easy-peasy, lemon-squeezy - and the results are delicious, home-cooked meals on the table without a spending an eternity in the kitchen!

Could there be anything sweeter than that?

Well, yes.

This sanity-saver doesn’t skip appetizers, sides, or desserts! Everything’s here to make your meal prep easier, dinners tastier, and more time to eat together as as family then get on with your evening.

With 5 kids in the house now, I’m going to be leaning heavily on this new cookbook as the school year gets under way. I really appreciate how simply things come together—so simply in fact, I can get the kids involved in the process. I’ve noticed how much more willing they are to try a new dish if they’ve had a hand in making it. Win, win!

Get your hands on your own copy and make your life easier!
(Would also make a great gift for anyone setting up an apartment or home or new parents!)

ORDER: "30 Minute Meals" by Six Sisters' Stuff

Summer Yummer | Lemon Tea Cakes

It’s full-on hot out. So hot, it’s difficult to think about food unless it's watermelon, or something equally cool… like these little treats. Yes, yes, you’ll have to turn your oven on, but do it in the early morning before the house really heats up, or in the evening when it’s cooled down a bit, then enjoy their lemony sweetness any other time during the day.

Lemon Tea Cakes, Mmmmmm…

Tea cakes were a staple at every baby or wedding shower I attended up until the early aughts when they seemed to have been forgotten by the food bloggers and recipe gurus that jostled for space on the internet. But they still reign supreme in my kitchen for a special event - or in this case, a sweet treat that doesn’t leave you feeling bogged down and heavier than you already do in the sweltering heat.

This recipe makes a very large batch, of somewhat small cookies. They practically melt in your mouth, yet have a satisfying chewiness that’s perfectly delectable. The sharp, refreshing tang of the lemon is what makes them perfect for the summer months. With a cup of hot tea in the morning, or a tall glass of iced tea in the afternoon. Suprise your guests and delight your family with a platefull!

Ingredients:

  • 1 cup butter

  • 2 cups sugar

  • 1 tsp vanilla

  • 2 eggs

  • 2 tbsp lemon zest (about 1 medium lemon)

  • 2 tbsp fresh lemon juice

  • 3 cups flour

  • 1/2 tsp baking powder

  • 1/4 tsp baking soda

  • 1/2 tsp salt

  • 1 cup powdered sugar +/-

Instructions:

  1. Preheat oven to 350 degrees.

  2. In small bowl, combine sugar and lemon zest, pinching and mixing to coat sugar in lemon oils. Transfer to larger mixing bowl then,

  3. Cream butter and sugar/lemon zest in a large mixing bowl. Beat in vanilla, egg, and lemon juice.

  4. Now combine flour, baking powder, soda, and salt in a small bowl and mix thoroughly. Add to creamed butter and sugar mixture and mix until well combined.

  5. Roll dough by teaspoonfulls into 1" balls, then roll in powdered sugar. Place on a baking sheet lined with parchment paper or silicone baking mat.

  6. Bake at 350 degrees for 9 – 11 minutes until till set and crackly. You don’t want bottoms to brown. Remove from oven and let sit for a couple of minute, then transfer to cooling racks to cool completely.

  7. Eat immediately or store in air-tight container for up to a week.

  8. Enjoy!

Strawberry "Poke" Cake (Repost)

Screen Shot 2019-04-22 at 4.29.55 PM.png

Back by popular demand - my Strawberry Poke Cake recipe.

I wish I could take credit for coming up with the idea, but it’s been around for some time and is already pretty well known.

For those who have never been introduced, here’s the basic info. A light, moist, refreshing desert, using a box cake mix, jello, and topped with fresh strawberries as a bonus!

I’m always one to improvise based on what I have on hand, or if I think I might like to change things up a bit, and I encourage you to do the same. For example, since Independence Day is around the corner, top with strawberries AND blueberries for a red, white and blue feast for the eyes and the mouth.

Cream cheese frosting is a departure I made from the recipe when it was given to me. I think whipping cream is what’s traditional. Do what you think you’ll like best!

Ingredients:

  • 1 box white, yellow (butter,) or even strawberry flavored box cake mix

  • eggs, oil and water as called for on the box

  • 1 (3 oz.) box Strawberry Jello

  • 1 cup boiling water

  • icing or whipped cream

  • sliced strawberries, for garnish

Directions:

  1. Prepare cake batter according to the packaging directions:

  2. Pour into greased 9x13 inch baking pan and bake, as directed.

  3. Remove from oven. Let cool 30 minutes.

  4. Using the handle of a large wooden spoon, poke holes all over the cake.

  5. In a medium bowl, stir together jello mix and boiling water until jello dissolves completely.

  6. Carefully pour mixture evenly over the top of cake. Cover with plastic wrap and place in fridge to chill for 2 hours or until Jello is firm and set.

  7. Remove from refrigerator and ice with cream cheese frosting (recipe below,) or whipped cream then garnish with fresh fruit.

  8. Serve immediately, or return to refrigerator until served.

CREAM CHEESE FROSTING:

  • 1/2 cup butter, softened

  • 8oz cream cheese

  • 4 cups powdered sugar

  • 2 tsps vanilla extract

Directions:

  1. Combine softened butter and cream cheese in medium bowl: beat on medium speed until well blended.

  2. Add powdered sugar and vanilla. Beat until creamy.

Freedom Fudge (Repost)

Screen Shot 2021-07-02 at 7.43.19 AM.png

Reprinted from June 2021

Am I the only one that gets a hankering for “out of season” foods? I think not. So when a friend said they were making “Freedom Fudge” to share at an Independence Day gathering, my eyes lit up and my mouth watered.

And besides, as someone who grew up in a coastal town summer tourism and fudge shops are pretty synonymous. But you don’t see fudge recipes circulating much in the summer time, they usually show up in our feeds around Thanksgiving. I mean to change that with this post!

This quick-fudge recipe that makes a plate-full of rich little morsels in a jiffy calls for only 3 ingredients.

It’s so quick and easy, you can make them any day of the year and the recipients will almost certainly erupt in smiles of gratitude.

My friend dressed them up for the 4th of July by drizzling melted white chocolate over the top and adding some red, white, and blue sprinkles. That seems like a lot of work to me, but if you want to, go ahead!

Ingredients:

  • 1 12oz package semi-sweet chocolate chips

  • 1 14oz can sweetened condensed milk

  • 2 Tablespoons unsalted butter


Directions:

  1. Place sweetened condensed milk and butter in saucepan and heat on stovetop on medium heat until butter is melted.

  2. Turn off heat and add chocolate chips, stirring until melted and mixed thoroughly.

  3. Pour into 8”x8” baking dish lined with waxed paper.

  4. Chill in refrigerator 3 hours or over night.

  5. Cut into squares and serve.


Double this recipe for a larger crowd and use a 9”x13” pan. Feelin’ nutty? Add half a cup chopped walnuts. Going soft? Toss in a cup of mini-marshmallows. Trying to lighten up? Substitute white chocolate chips….

Keep it simple, or make it a show-stopper, ‘cuz hey, it’s a free country!

Freedom Fudge; your fudge, your way. Any time of the year!

Delilah logo red.png