recipe

Iced Lemon Loaf

Reprinted from 2022

I don’t find myself in a Starbucks drive-thru very often, but when I do, their lemon loaf is a temptation that’s difficult - correction - impossible to pass up! I love the dense moist crumb cake and the sweet bright icing!

My sister and nephew recently tried to recreate this lemony goodness in their kitchen, because apparently he loves this treat even more than I do. Their attempt turned out temptingly tasty and quite beautiful too!

Paired with a cup of Bigelow tea (might I suggest the Lemon & Echinacea?) you can’t find a more perfect spring-time mid-day pick-me-up (say that three times real fast!), or a more welcome offering at an Easter brunch table!

Here’s everything you need to make 2 full loaves, one for yourself and one to share!

Ingredients:

Loaf:

  • 3 cups all purpose flour

  • 1 teaspoon baking powder

  • 1/2 teaspoon baking soda

  • 1/2 teaspoon salt

  • 1 cup unsalted butter – softened

  • 2 cups granulated ugar

  • 6 large eggs

  • Zest of 2 large lemons

  • 4 Tablespoons of lemon juice (plus 2 more for icing)

  • 2 teaspoons vanilla extract

  • 2/3 cup sour cream

Icing:

  • 2 cups powdered sugar

  • 2 tablespoons lemon juice

  • 2 tablespoons milk or water

Directions:

To make the loaves

  1. Preheat oven to 350 degrees

  2. Grease and flour two standard bread loaf pans

  3. Whisk the dry ingredients together in a medium-sized bowl: flour, baking powder, baking soda and salt

  4. Now, in a large bowl, beat the softened butter and the sugar together until very well combined

  5. Add one egg at a time to the sugar and butter mix, then the vanilla, lemon zest and lemon juice

  6. Add the dry mixture to the wet mixture a little at a time, alternating with the sour cream while mixing on low speed.

  7. Once fully combined, pour half the mixture into one loaf pan, and repeat with the rest of the mixture into the second loaf pan. The batter will be somewhat thicker than a cake mix

  8. Bake for 45 - 55 minutes, until a toothpick inserted near center comes out clean

  9. Cool on wire racks.

For icing:

  1. Combine powdered sugar, lemon juice, and milk (or water) mixing well, to make icing.

  2. Ice loaves once cooled.

Slice, serve, and enjoy!


*Note - These lovely lemony loaves seem best enjoyed fresh. Left overs, though stored in a sealed baggie, became quite dry after just a few days.

** 2nd Note - My nephew solved the stale loaf issue by cutting the remaining slices into cubes, placing in a bowl, and covering with half-n-half, a la, old fashioned strawberry shortcake! He says he’ll always save a few slices to do this with from now on!

Spinach & Feta Orzo with Fresh Dill

IMG_8790.JPG

With the arrival of autumn my taste buds crave savory comfort foods. I’m always on the lookout for delicious new dishes that fit the season, aren’t so difficult to prepare, (that I spend twice as long making it than our time around the dinner table lasts) and will appeal to my kiddos.

This creamy orzo dish loaded with fresh spinach (rich in iron, vitamin K, vitamin A, vitamin C and folate, as well as being a good source of manganese, magnesium, and vitamin B2!) boasting of fall flavors like garlic and dill, is just the ticket!

The feta cheese makes it somewhat filling, while the lemon zest keeps it light enough to pair along side a salmon or chicken fillet, or even some pork tenderloin medallions.

This dish comes courtesy of my nephew Dalton, who loves to try new recipes and is happy enough to share those that delight with me, and I in turn, with you.

This recipe serves about 4. I triple it for my brood!

Enjoy!


Spinach & Feta Orzo with Fresh Dill

Ingredients:

  • 2 tablespoons unsalted butter

  • 4 scallions, trimmed and thinly sliced

  • 2 large garlic cloves, minced

  • 8 ounces spinach leaves (about 8 cups), coarsely chopped

  • 1 teaspoon kosher salt

  • 1 ¾ cups vegetable stock

  • 1 cup uncooked orzo pasta

  • zest of one lemon

  • ¾ cup crumbled feta cheese, plus a bit more for garnish

  • 1 cup chopped fresh dill

Directions:

  1. Melt butter in large skillet over medium heat. Add chopped garlic and scallions (reserving a bit of the green for garnish,) - cook until softened.

  2. Stir in chopped spinach and about 1/2 teaspoon salt. Cook, stirring occasionally, until spinach is wilted, (about 5 minutes.)

  3. Pour in stock and bring to a simmer.

  4. Add orzo, lemon zest, and another 1/2 teaspoon salt. Stir together well, then cover and simmer over medium-low heat until orzo is plump and most of the stock is absorbed, (10 to 15 minutes.)

  5. The last step is to stir in crumbled feta cheese and the chopped dill, then cover and cook for about another minute or two, so that the cheese begins to melt into the mixture.

  6. To serve, dish onto plates, garnish with reserved scallions and another sprinkle of feta cheese.


Red, White, and Blueberry Beet Salad

thumbnail_Facetune.jpg

Reprinted from July 2019

Here’s a fun, festive, 4th of July salad for your holiday table. My sister made this one up just for the occasion (and because she knows I LOVE beets, even if she doesn’t!)

It calls for 4 very basic ingredients as well as a basic vinaigrette dressing made with red-wine vinegar. You can whisk one up yourself, or use a bottled one you’ve purchased, whichever get’s the job done to your satisfaction and gets you out of the kitchen and back into the celebration as quickly as possible.

You’ll wow your guests (or your hosts) when you place this on the banquet table!

Red, White, and Blueberry Beet Salad

Ingredients:

  • 5-6 large beets, peeled, cooked (you may boil or roast - your choice), cooled, and cubed

  • 2 pints of blueberries, washed and drained

  • 6-8 ounces feta cheese, crumbled

  • a bed of baby spinach

For the dressing:

  • ½ cup olive oil

  • 4 tablespoons red wine vinegar

  • 1 tablespoon Dijon mustard

  • 1 tablespoon honey or agave syrup

  • 2 medium cloves garlic, pressed or minced

  • ¼ teaspoon fine kosher salt, to taste

  • Freshly ground black pepper, to taste

Directions:

  1. Make the vinaigrette dressing:

    1. In a liquid measuring cup or bowl, combine all of the ingredients except oil. Stir well with a small whisk.

    2. Drop a single drop of oil into the mixture and whisk briskly, add another drop and continue to whisk, then add remaining oil in a stream, continuing to whisk until well blended.

    3. Taste, and adjust as necessary.

  2. Place cooked cubed beets in large bowl, add blueberries, pour viniagrette over top and mix well.

  3. Place baby spinach leaves on serving platter.

  4. Layer dressed beets and blueberries over the top of spinach, then sprinkle liberally with crumbled feta cheese.

  5. Refrigerate until serving.

Enjoy this salad, bursting with red, white, and blue flavor, as we celebrate our great nation’s birthday! I hope your 4th full of your favorite ingredients, and mixes up to be a happy and safe holiday!

Cauliflower 'Faux-tato' Salad

Fauxtato+Salad.jpg

Reposted from June 2019:

My potato salad is famous (or perhaps infamous, not sure which…) and I’ll make it for any occasion; BBQ’s, birthdays, bar mitzvah’s… but (confession session) sometimes I crave a lighter dish.

Enter this delicious “faux-tato” salad made with steamed cauliflower florets - it’s so so tasty, but far lower in carbs. It’s got everything you want for a great picnic salad except all the starch. Go ahead, give it a try!

Ingredients:

  • 1 large head cauliflower, cut into florets

  • 1/2 cup bacon bits (about 6 rashers of bacon)

  • 1/2 c. sour cream

  • 1/4 c. mayonnaise

  • 1 tspn stone-ground mustard

  • 1 tbsp. dill pickle brine (vinegar or lemon juice work too!)

  • Salt and Pepper

  • 1 1/2 c.  cheddar cheese, shredded

  • 1/4 c. chives, chopped small

Directions:

  1. Add cauliflower florets to about 1” of boiling water in large pot or pan. Cover and allow to steam until tender - about 5 minutes. Remove from heat, drain, and cool. Set aside.

  2. Cook bacon rashers until crispy, turning to crisp each side. Drain on paper towels then break or chop into bits.

  3. Mix together, sour cream, mayonnaise, mustard, pickle brine (or vinegar or lemon juice) in a large bowl. Add the steamed and cooled cauliflower florets and gently stir to coat. Season with salt and pepper, then fold in bacon, cheddar, and chives. Serve warm or at room temperature.

Of course, like most of my recipes, they’re more suggestion than anything else. If you have a particular way you like to dress your potato salad, give it a try only use the cauliflower florets instead of starchy ‘taters.

I’m always interested in what you think - so tell me if you try this, any adjustments you might make to it, and most importantly, what was the cause of your gathering and celebration?! I’m nosy that way!

Korean Soy-Pickled Cabbage

Korean Pickled Cabbage (with soy sauce & vinegar)

Pickled cabbage can add a kick to salads and a tang and crunch to a variety of dishes. It’s a fantastic side with rice to sesame or ginger chicken, or any teriyaki, and loved in our household as a simple and convenient snack.

Even though my friend, and house-helper Kimmy makes several batches weekly (so we always have some on hand in the refrigerator) it never lasts as long as she thinks it will!

There are countless variations on the basic recipe out there, but this is one she (and I) make often, and it’s so simple anyone can do it!

(Feel free to use your favorite cabbage, add a shredded carrot, or a few tablespoons of sugar to the brine for a little sweetness. Omit the pepper flakes if spice isn’t your thing!)

Ingredients:

  • 2 small heads of cabbage (any kind you want), shredded

  • 2 large white onions, thinly sliced

  • 1 whole head of garlic peeled and minced

  • 1 tablespoon pepper flakes (for kick)

  • 2 cups soy sauce (low sodium)

  • 1 cup rice (or white )vinegar

  • 4 clean, sterilized quart jars, or equivalent mixture of pints/quarts to equal approximately 1 gallon with clean, tight fitting lids.

Instructions:

  1. In a large bowl combine shredded cabbage (slice thinly or use a mandolin), onion, minced garlic, and red pepper flakes.

  2. Once well combined, divide among your clean, sterilized storage jars.

  3. Bring the soy sauce and vinegar to a boil in a saucepan, stir well, then pour into the jar covering the cabbage mixture making sure the liquid covers all cabbage. Let the jar sit on the counter while cooling to room temperature. You may leave out for a few days, the longer it’s left to “ripen”, the more intense the flavor will become. Refrigerate when ready.

  4. Pickled cabbage will keep in the refrigerator for several weeks and flavors will continue to ripen. Be sure to use a clean utensil when removing single servings from a jar so you do not introduce any bacteria into the mixture.

  5. Eat with rice as a side dish. 

Enjoy!


Cucumber - Onion Salad

Salad was on the table for every family meal my mother ever made. (Or at least something she'd refer to as salad. )

In the summer months, when the garden was "putting on", it would be thick slabs of beefsteak tomatoes on top of a slice of Wonder Bread slathered with Miracle Whip, with a generous dash of salt and pepper...

Or, on the rare occasion there wasn’t a tomato to be carved up, a bowl of cucumber and onion, marinated in a bit of water and vinegar for only the amount of time it took her to pound, dredge, and fry the round steak and boil the potatoes, would suffice. These too, we’d make an open-faced sandwich with - minus the Miracle Whip, plus a little butter - and call it “salad”!

I'm sharing the recipe with you today not because its new, or novel, or difficult, but for all the other reasons; it's old, it’s nostalgic, and it’s easy. It’s also cool and refreshingly delicious on a hot summer evening - like all the evenings have been as of late. Eat it as it was probably meant to be eaten - as a side salad - or try it with bread and butter like my folks always did. Either way, it’s yummy!

Cucumber - Onion Salad

Ingredients:

  • 1 large cucumber, peeled and sliced

  • 2-3 slices of sweet or red onion

  • 1/2 cup white vinegar

  • 1 cup cold water

  • 1 heaping Tablespoon of sugar

  • 1 teaspoon salt

  • 1 teaspoon pepper

Directions:

  1. Peel and slice cucumber, and slice onion - seperating rings. Place in a bowl and add vinegar, water, sugar, salt and pepper.

  2. Mix well.

  3. Refridgerate for at least 45 minutes.

  4. Serve.

Feel free to adjust the vinegar to water ratio, the sugar, and salt and pepper to taste! Enjoy this nostalgic taste of summer!


Pumpkin Cheesecake

Mmmmm. I haven’t made my annual skating in Central Park trip to New York now for a few years. I miss seeing all my East Coast friends, I miss the city that never sleeps, Broadway performances, window displays, and boy, oh boy, do I miss Junior’s sandwiches and cheesecakes!!!

This little number showed up on a holiday table recently and alllllmost scratched my cheesecake itch. (The flavor was there, just not the jostling crowds, noises, and endless energy found in the Junior’s dining room!)

It’s your basic graham cracker crust cheesecake recipe, all dressed up in fall finery with the addition of 15oz of pumpkin and her spicy companions we just can’t seem to live without.

Wow your family and your guests, or simply indulge yourself with this decadent little treat.

Ingredients:

Crust:

  • 1 1/2 cups graham cracker crumbs

  • 6 Tbsp unsalted butter, melted

  • 1 Tbsp sugar

  • 1 tsp cinnamon

Filling:

  • 3 (8oz) packages cream cheese, softened

  • 1 1/2 cups packed light brown sugar

  • 15oz canned pumpkin

  • 4 large eggs

  • 1/4 cup sour cream

  • 2 tsp pumpkin pie spice

  • 1/4 tsp salt

  • 1 Tbsp vanilla extract

Directions:

Preheat Oven to 350˚F.

Crust:

1. Use a food processor to pulse graham crackers to create fine crumbs .

2. In a medium bowl, mix together graham cracker crumbs, melted butter, sugar, and cinnamon. Dump into a 9” springform cheesecake pan and use a cup, glass, or large spoon to press the mixture down covering the bottom of your cake pan and pushing 1/3-1/2 of the way up the sides.

3. Bake at 350˚F for 8-10 minutes. Allow to cool before adding cheesecake filling.

Filling:

  1. In a medium bowl, beat the cream cheese and brown sugar on smooth (no lumps, bumps, or chunks!).

  2. In a separate bowl, whisk together pumpkin, eggs, sour cream, pumpkin pie spice, salt and vanilla extract. Add this well-combined mixture to the cheesecake filling and continue mixing on low speed just until uniform in color and consistency.

  3. Pour filling into pre-baked crust, place in oven on middle rack, and bake at 350˚F for 1 hour. Turn off heat, prop the oven door open slightly, and allow to cool for 1 hour. *

  4. Remove from the oven and allow to cool a bit longer, until the cheesecake reaches room temperature. Then cover and refrigerated at least 4 hours or overnight.

  5. Just before serving, remove from its springform pan (run a knife along the sides, then release the spring and remove the rim.)

  6. Serve with whipped cream and a sprinkling of cinnamon or pumpkin spice mix.

    *Note - If you are comfortable doing so, use the water-bath method to bake. Cheesecakes love moist environments and this will help to prevent the top from cracking and the center from falling. (If you’re NOT all that comfortable with water-baths, skip it!)

Back-to-School Blackberry Scones

Screen Shot 2021-08-31 at 1.07.25 PM.png

For most of the country, school is going to be back in session - IN PERSON - at least as we begin this new school year. I don’t know about yours, but MY kids are ecstatic!

Gone are the moans and groans I’ve grown used to over the nearly 40 years I’ve been at this motherhood thing, and in their place is such joy and enthusiasm over in-classroom learning I’ve never seen before! It’s got me excited too! (Yes, I DO realize the learning aspect has little to do with the anticipatory glee - it’s all about seeing friends again!!)

If you still have some plump juicy blackberries hanging around begging to be picked before the falls rains set in (Oh please, oh please, we NEED the fall rains!) all you need is a cup of them to mix up a batch of these scones and make your kids first school morning even sweeter than they could have imagined! If you go the extra step and add the lemon glaze, you’ll be so glad you did! It adds a touch of sweetness and the citrus is a nice crisp contrast to the soft warm sconce.

There are two main points to remember when it comes to making scones - one, it’s ALL ABOUT THE BUTTER. The colder, the better! And, don’t over-work the dough; give it a light touch, pat gently into place before cutting into wedges.

Give ‘em a try!

Blackberry Scones with Lemon Glaze

Ingredients:

Screen Shot 2021-08-31 at 1.04.53 PM.png
  • 3 cups all-purpose flour

  • 2/3 cup sugar

  • 2 teaspoons baking powder

  • 1/2 teaspoon baking soda

  • 1 teaspoon salt

  • 1/2 cup butter, cold and cut into cubes or you can use frozen butter and grate it in.

  • 1 egg, beaten

  • 1 1/4 cups heavy cream

  • 1 cup blackberries

For the glaze:

  • 1 cup powdered sugar

  • zest and juice of 1/2 lemon (about 1 Tablespoon of each)

  • splash of cream

Directions:

  1. Preheat oven to 375 degrees F.

  2. Whisk the dry ingredients together in a large bowl: flour, sugar, baking powder, baking soda, and salt.

  3. Next, add the cold butter. A pastry cutter works great if you’ve used cold butter cut into cubes. If you’ve grated in frozen butter, just toss it to coat well. (All butter should be no larger that pea-sized.)

  4. In another bowl, whisk egg and cream together. Combine with dry mixture, and mix with a fork, just enough until dough comes together.

  5. Add the berries to the dough, gently turning into the dough, trying not to squish too much juice out of the berry.

  6. Turn out the dough onto a lightly floured surface and pat into a round shape about 1” thick. Using a sharp knife dredged in flour, cut the round into about 8 wedges of the same size.

  7. Transfer to a a parchment-lined baking sheet and bake for 25-30 minutes, until golden brown on top.

  8. Serve warm or continue with the next step to add a lemon glaze.

  9. While the scones are baking, make the glaze. Mix 1 cup powdered sugar with the zest and the juice of 1/2 a lemon. Add a splash of cream if glaze is not thin enough. (Conversely, add more powdered sugar if you want a thicker glaze.)

  10. Brush warm scones with half the glaze, wait until they have cooled a little bit (10-15 minutes) and brush again. Serve.

Delilah Logo.png
Screen Shot 2021-08-31 at 1.08.12 PM.png

Hot Cross Buns

thumbnail_image0.jpg

Easter Sunday is April 12, and not even the coronavirus can stop the holiest of holy days from arriving and blessing our lives! It will definitely be celebrated differently this year, no church services or community egg hunts, but perhaps the season will be even more meaningful, as we have been given (forced!) time to pause and to praise.

We will worship as a family, have a small egg hunt in the yard, and eat together. Of course there will be deviled eggs, and this year, thanks to a little inspiration from my niece, Charisa, we’ll all enjoy a traditional hot cross bun, with the non-traditional twist of chocolate chips instead of raisins or currants (which I would prefer, but my children will definitely like these better!)

These orange flavored spiced buns, loaded with treats, and marked with the sign of the cross will be a welcome addition to your Easter meal, whomever you’re enjoying it with, even if it’s just you! Enjoy!

INGREDIENTS:

For the dough:

Screen Shot 2020-03-31 at 11.30.14 AM.png
  • 4 cups all-purpose flour

  • 2 and 1/4 teaspoons fast-acting yeast

  • 1/2 cup sugar

  • 1 teaspoon ground cinnamon

  • 3/4 cup chocolate chips

  • 1 cup milk, warmed

  • 1/4 cup unsalted butter, melted

  • 1 large egg

  • 1/4 cup orange juice

  • Zest of 1 large orange

For the crosses:

  • 1/2 cup all-purpose flour

  • 1 tablespoon sugar

  • 1/4 cup water

For the glaze:

  • 1/4 cup sugar

  • 1/4 cup orange juice

DIRECTIONS:

  1. In a large bowl, whisk together the flour, yeast, sugar, and spice. Stir in the chocolate chips.

  2. Make a well in the center of the mixture, and add the milk, butter, egg, orange juice, and orange zest. Mix well, then bring everything together with your hands to form a sticky dough.

  3. Transfer the dough to a lightly floured surface, and knead for about 5 minutes until smooth and elastic. Place the dough into a lightly greased bowl.

  4. Cover with plastic wrap and leave to rise in a warm place for 1 hour, or until doubled in size.

  5. Divide the dough into 12 balls. Place them in a greased 9×13-inch baking pan, cover with plastic wrap, and leave to rise in a warm place for another hour, or until they are touching and doubled in size. (Coating the plastic wrap on the side touching the buns with cooking spray will help prevent sticking.)

  6. For the crosses, whisk together the flour and sugar. Stir in the water until smooth. Place into a piping bag (use a zip-lock baggie with the corner snipped away) and pipe crosses over the buns.

  7. Bake for 18 – 20 minutes, or until risen and golden brown.

  8. For the glaze, gently heat the sugar and orange juice in the microwave until the sugar has dissolved. Brush the glaze over the hot buns, and serve warm.

Delilah Logo.png

Tasty Lentil Coconut Curry

IMG_6838.jpeg

Whole grains and legumes are packed with fiber and nutrients. I love cooking with them and serving them up to my family, but sometimes I get stuck in a rut. Does this sound like you?

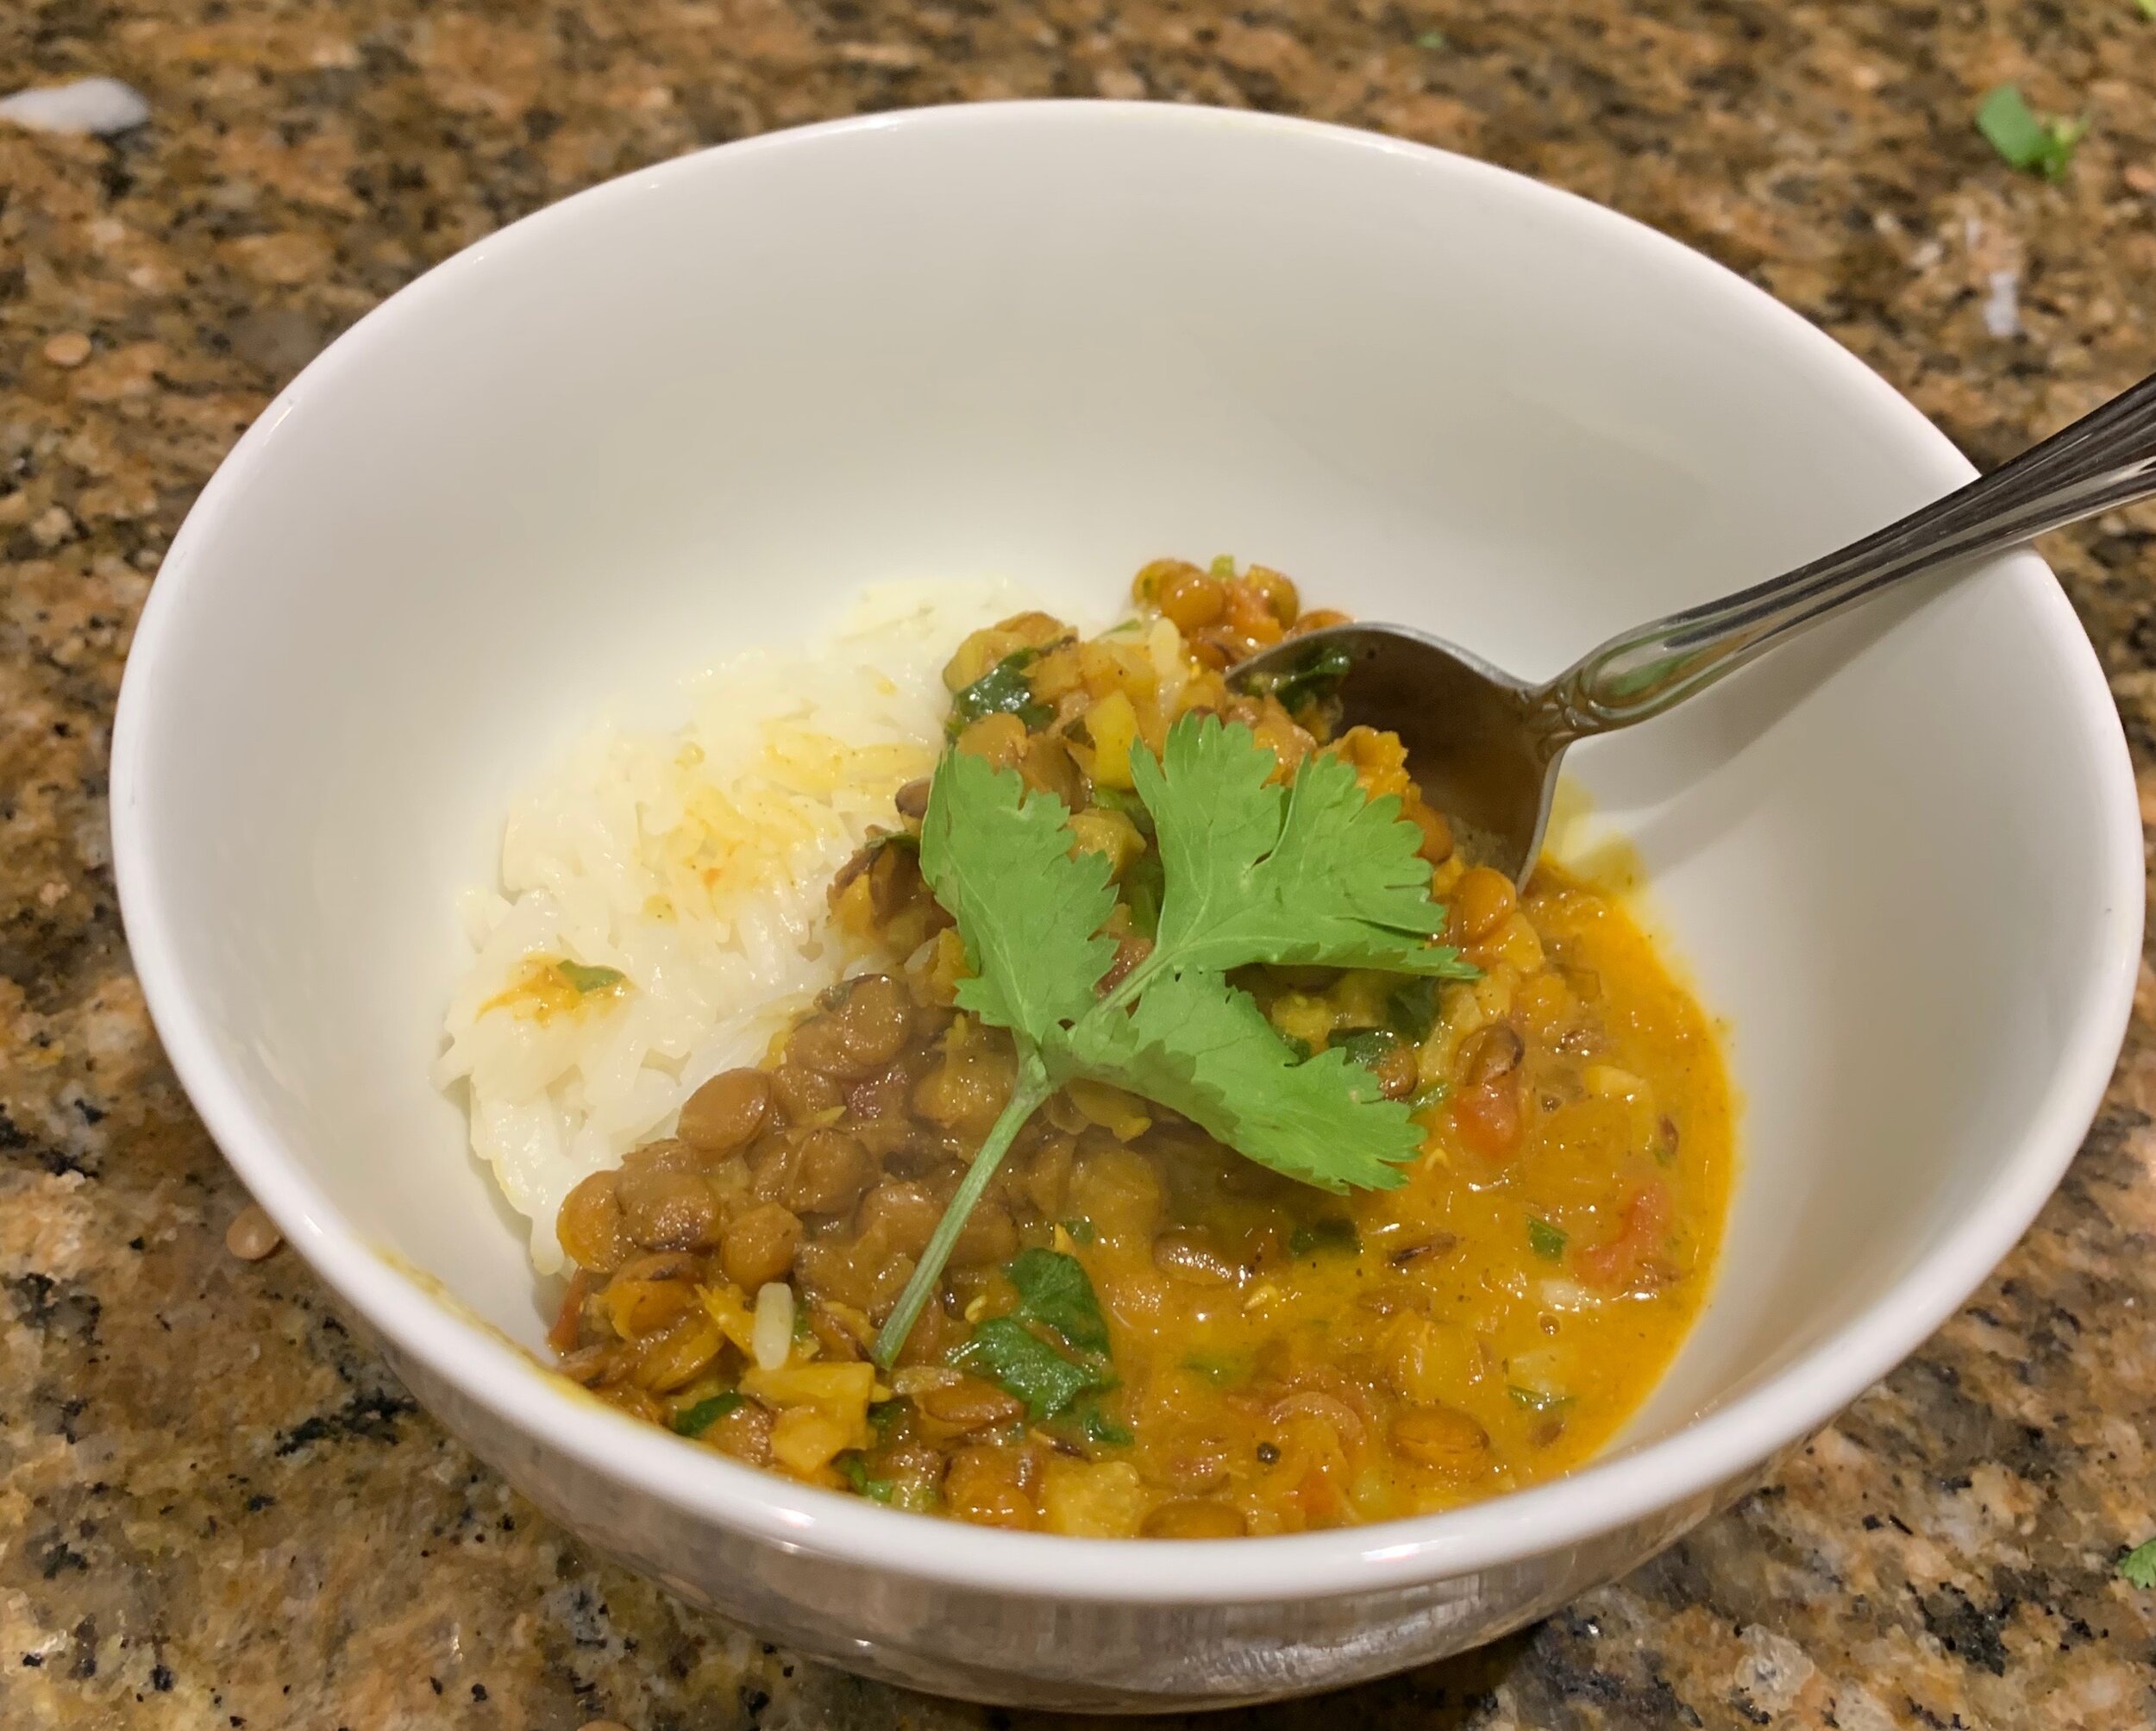
That’s why I was excited when a friend brought over this super yummy lentil coconut curry dish for us to try.
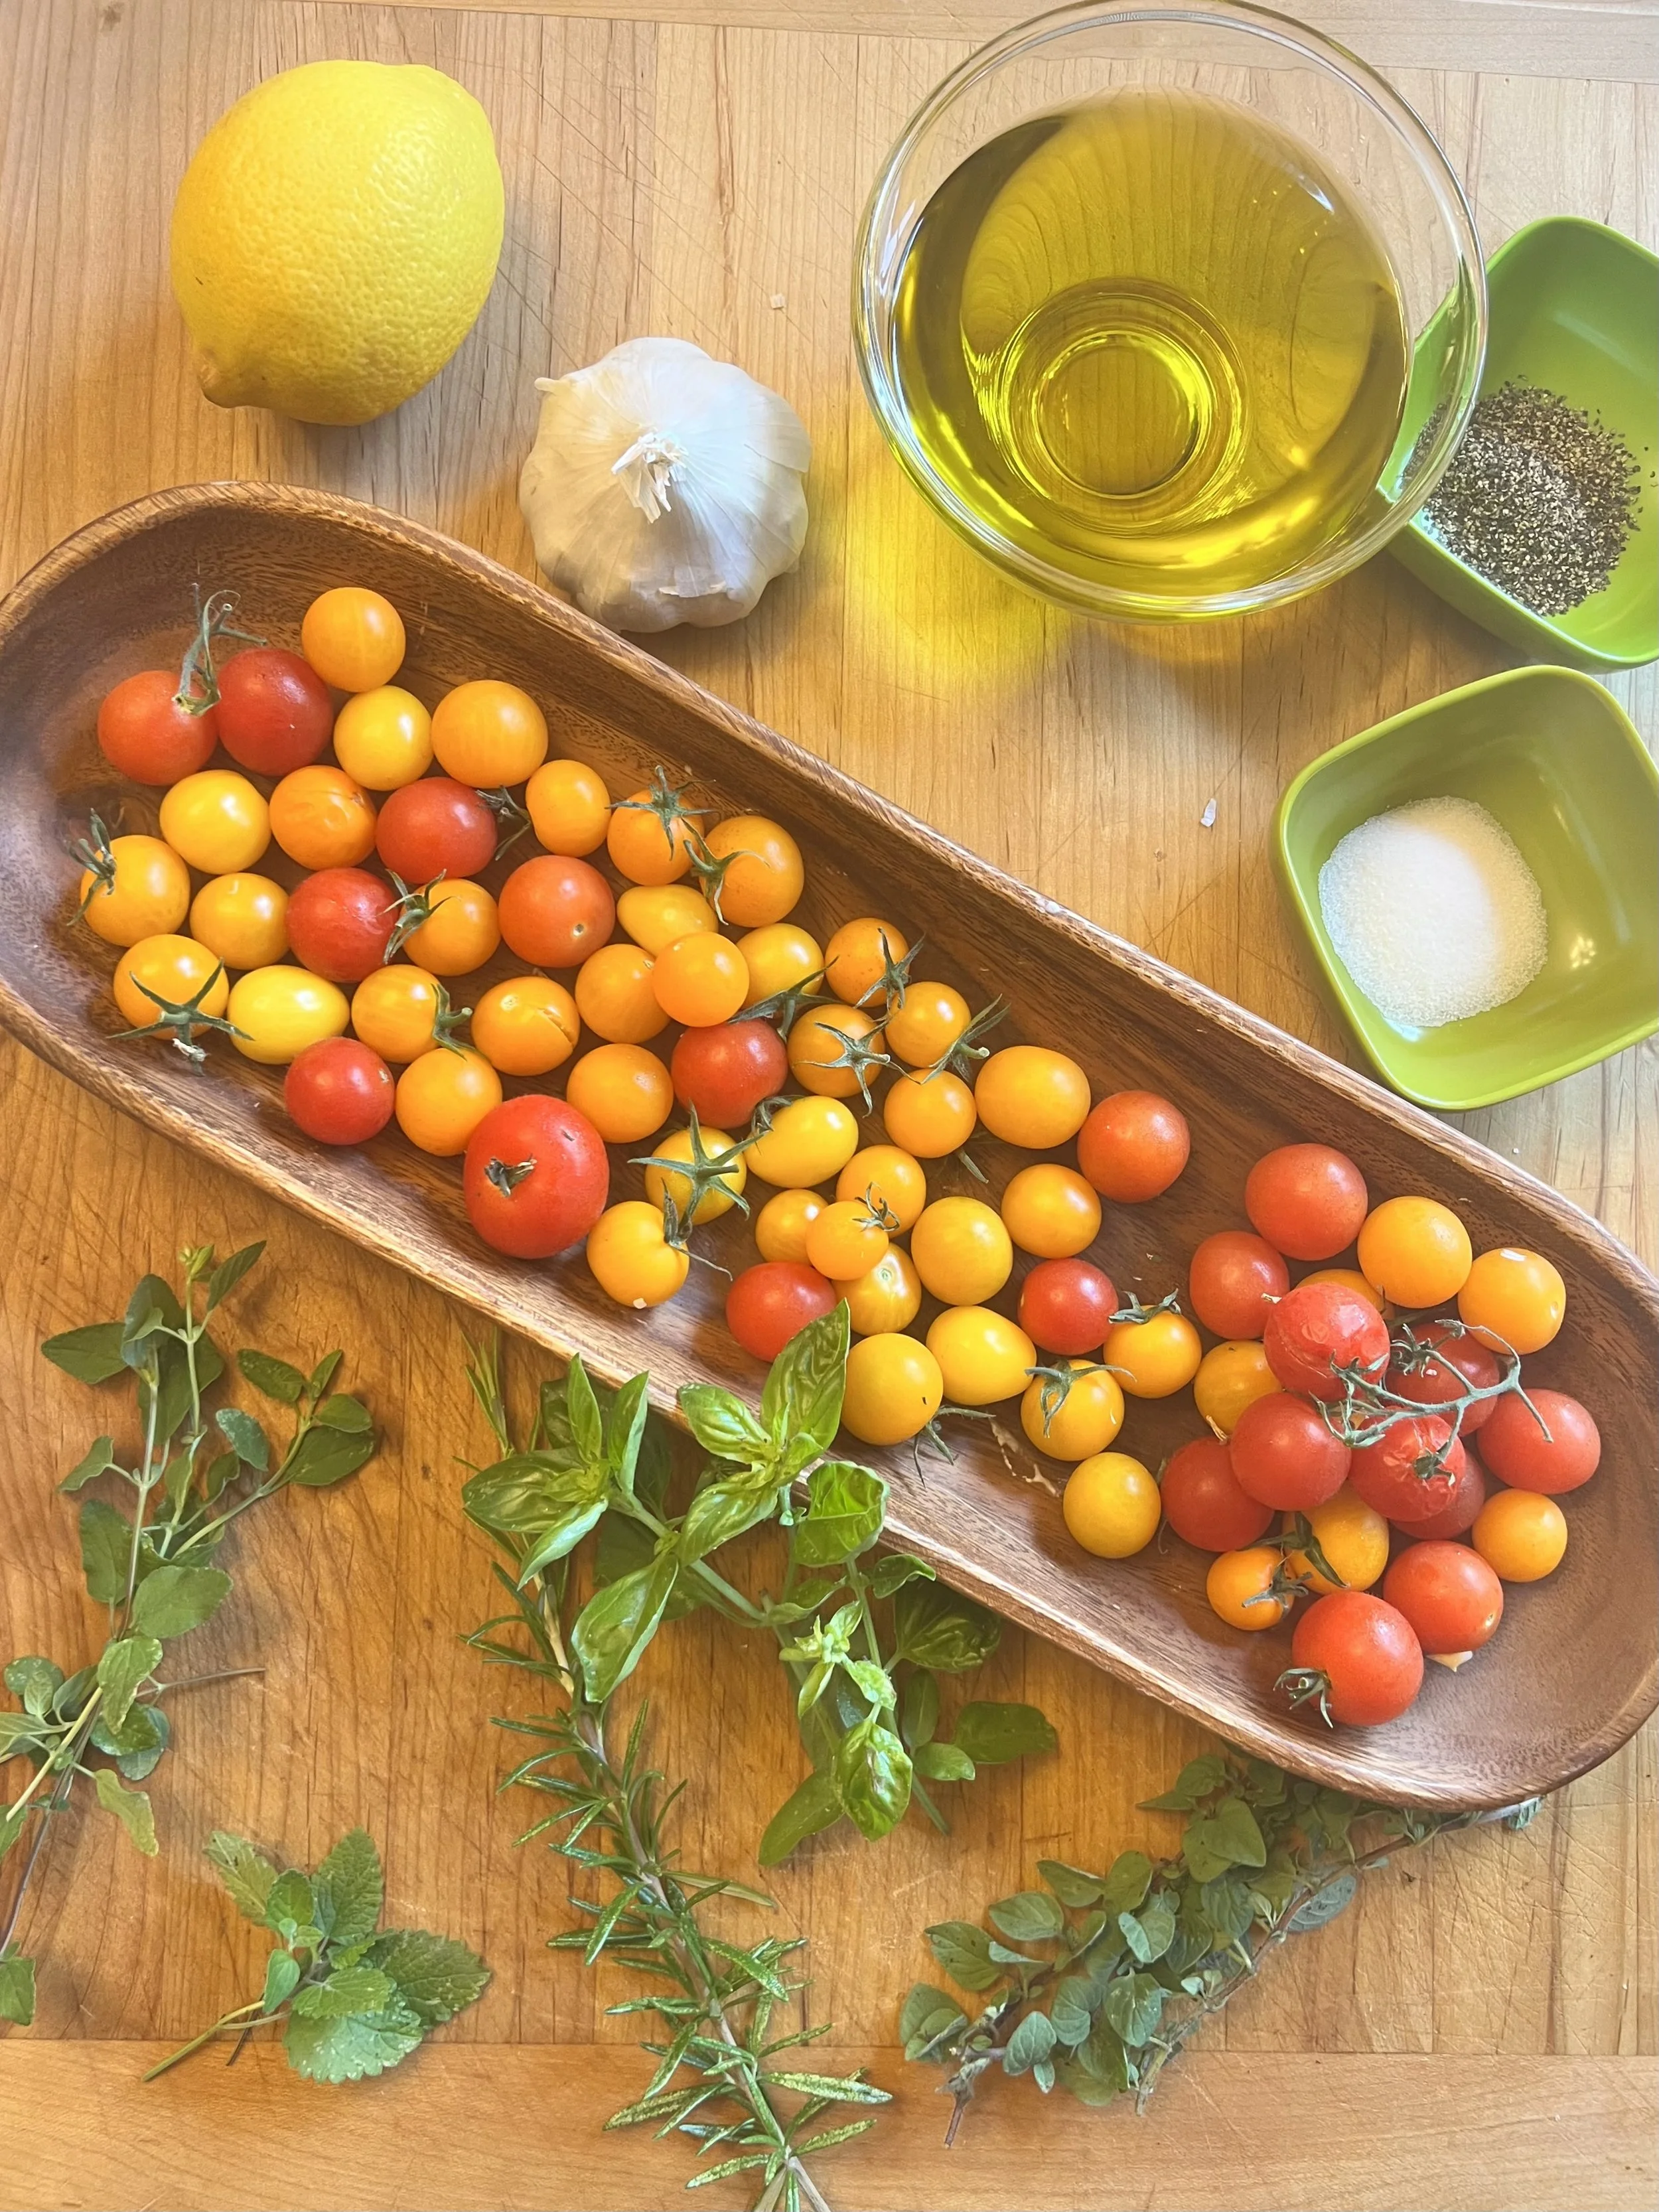
 It was packed full of fresh ingredients, flavor, and fiber, and it was oh-so filling!

It would be a perfect dish to try on a “Meatless Monday,” if you’re into that. I really enjoyed the leftovers as they seemed to be even more flavorful after all the spices and ingredients had a chance to hang out together over-night in my fridge.

Give this a try and let me know what you think!

ps - I added a “Supercheat” if you are more like me than we sometimes want to admit, and find yourself long on intention, but short on time or patience… scroll to the bottom for my suggestion.

Lentil Coconut Curry

Ingredients:

IMG_6833.jpeg
  • 3 tablespoons coconut oil

  • 1 full head of garlic, chopped

  • 1 16-ounce can of diced tomatoes

  • 2 tablespoons freshly grated ginger

  • 1 tablespoon turmeric powder

  • 1 tablespoon ground cumin

  • 1 teaspoon cayenne pepper

  • 2 teaspoons sea salt

  • 1 cup dried lentils

  •  3 cups of water

  • 1 13-ounce can of coconut milk 

  • 1 cup chopped fresh cilantro

Instructions:

IMG_6834.jpeg
  1. Using a large pot or skillet, saute’ chopped garlic in coconut oil over medium-high heat until softened and a bit browned. 2-3 minutes

  2. Add diced tomatoes, grated ginger, cumin, turmeric, and sea salt. Cook for 5 minutes, stirring the mixture so that it heats evenly and does not stick to bottom of pot.

  3. Add the water, dry lentils, and the cayenne pepper to the pot and bring it to a boil. Reduce the heat to low, cover, and let it simmer for about 30 minutes or until the lentils are cooked and have softened. Stir a few times so nothing sticks to the bottom of the pot.

  4. Once mixture has thickened, and the lentils are soft, add the coconut milk and bring the pot back to simmer for a few minutes.

  5. Stir in chopped fresh cilantro before serving over basmati or jasmine rice.

Supercheat:
Use a can of diced tomatoes, a can (or two) of lentils, a couple large dollops of curry paste, a can of coconut milk, and finish off with fresh cilantro. No, it won’t be as good, but it will still be yummy, warm, and filling!

Be A Star - With Star Fruit!

thumbnail_IMG_4632-1.jpg

Be the star of the show this holiday season with Star Fruit!

Here’s a tip for dressing up your holiday dishes; Star Fruit!

starfuit1.png

You've seen it in on your grocery aisles, maybe even purchased it to satisfy your kid's’ curiosity, but if you lead your holiday meals with this bright gold star, you'll be considered a true wiseman!

Carambola, or Star Fruit, is native to Indonesia but is now cultivated in many tropical areas. It's about 2-6" long and when ripe it's a deep yellow color. Most of the fruits have 5 ridges, giving it a classic star shape, but some can have more or less. The skin is thin and waxy and may be eaten, just like that of an apple or plum.

Starfruit 2.png

There's no special preparation to eating - just wash, then slice it up as thick or thin as you desire, and remove the seeds.

Use it on your salads - like the spinach, red onion, pomegranate, and star fruit example here. Or in your traditional fruit salad. On your cheese platters, to dress your ham alongside the pineapple, and in your jello-treats.

It's mild flavor, both sweet and a tart, make it a complementary companion to just about every thing on your holiday buffet!*


So go ahead, be the star of the show with star fruit!

* Star fruit should not be consumed by people with kidney disease or on dialysis and can interact with prescription medications much like grapefruit. Do your research if you have any questions!

Tomato Basil Bisque

Screen Shot 2019-10-23 at 2.05.14 PM.png

Fall marks the beginning of soup season in my house (for just about everyone else I know too!) and I’m always looking for new recipes to try.

This week, our studio engineer, Jessica, brought a delicious looking bowl of soup into work with her for lunch… It smelled so good as she was reheating it, I had to know what was in it! (I also might have begged a taste…)

Turns out, not only is Jess super bright when it comes to audio engineering… she’s a great cook too! This is a yummy example of a simple, but absolutely fabulous tomato basil bisque that she makes often through the chilly months. I had her forward the recipe to me so I could share it with all of you.

Jessica roasts her own Roma tomatoes, because it’s a fairly easy process. But if you want to whip (blend?) this together quickly, you can pick up a few cans of fire-roasted tomatoes in your grocery aisle.

Jessica’s Tomato Basil Bisque

Ingredients:

  • 1/2 onion - chopped

  • 1/4 cup plus 2-3 tbsp olive oil

  • 4 garlic cloves - minced

  • 20-22 Roma tomatoes, roasted (or 2 cans fire roasted tomatoes)

  • 1/2 package (4oz) cream cheese

  • 2 cups chopped fresh basil leaves

  • 1 cup of half ‘n half


Directions:

  1. Roast tomatoes with olive oil ahead of time using method described below soup instructions.

  2. Cover bottom of stock pot with 1-2 tablespoons olive oil. Place over medium heat.

  3. Add chopped onion and cook until translucent. Add minced garlic and cook about 5 minutes, stirring constantly until garlic begins to brown.

  4. Add the roasted tomatoes*, basil, and cream cheese at this time, and bring to a low boil. If it is looking dry, add about 1/4 cup of water so that the mixture does not scorch.

  5. When the cream cheese has fully melded with the other ingredients remove from heat and allow to cool slightly.

  6. Using an immersion blender, blend in the pot until the mixture is smooth and creamy. Bring up heat once again, and add half ‘n half (or reduced fat milk.) Let sit for about five minutes stirring occasionally then serve.

  7. Garnish with a dollop of sour cream and a fresh basil leaf.

* To roast tomatoes: Cut off stem, slice tomatoes in half lengthwise. Arrange cut side down on baking tray and drizzle with olive oil. Place under broiler for about 15 minutes; remove tomatoes once charred spots start appearing. Let cool, chop coarsely, retaining as much of the juice as possible.

Thanks for sharing your recipe with us, Jessica!

Delilah Logo.png


"Waffle" Cake - Fun to Make!

thumbnail_IMG_4001.jpg

Recently, Producer Leisa ordered a “waffle cake” from a local maker for a special celebration in her home and showed off photos of this special creation. All of us in the studio were intrigued. What in the world is a waffle cake?!

Turns out, it’s exactly what it sounds like; waffles made from cake batter, stacked and iced, to make a cake! A new food trend we could definitely all get behind. Who doesn’t love waffles? Who wouldn’t want a reason to eat them mid-day or in the evening, smothered in icing?!

So we did a little research (i.e. we “Googled it”) and discovered that you can put almost any kind of batter in a waffle iron… think waffle, banana bread, chocolate cake… yep, it all works! Why did it take so long to think this up?

Leisa had ordered a strawberry cake with raspberry icing, it came gorgeously decorated with natural flowers and dusted with powdered sugar. The studio folks decided to take matters into their own hands this week and celebrate fall - any excuse for cake, especially if it’s a waffle cake!

They decided on carrot cake with cream cheese icing. Here’s the result recipe and the directions. It turned out OH SO GOOD and OH SO PRETTY!

Carrot Waffle Cake with Cream Cheese Icing:

Ingredients:

For the Carrot Cake:

thumbnail_IMG_3983.jpg
  • 2 cups all-purpose flour

  • 2 teaspoons baking powder

  • 1 teaspoon baking soda

  • 1 1/2 teaspoons ground cinnamon

  • 1/2 teaspoon ground ginger

  • 1/4 teaspoon ground nutmeg

  • 1/2 teaspoon salt

  • 3/4 cup or vegetable oil

  • 4 large eggs room temperature

  • 1 and 1/2 cups light brown sugar

  • 1/2 cup granulated sugar

  • 1/2 cup unsweetened applesauce

  • 1 teaspoon pure vanilla extract

  • 3 cups grated carrots, lightly packed

For the Cream Cheese Icing:

  • 1 (8-ounce) package brick style cream cheese, softened to room temperature

  • ½ cup unsalted butter, softened to room temperature

  • 2 cups powdered sugar

  • 1 teaspoon pure vanilla extract

Instructions:

For the Carrot Cake:

  • In a large mixing bowl, whisk together the flour, baking powder, baking soda, cinnamon, ginger, nutmeg, and salt until well combined. Set aside.

  • In a separate large mixing bowl, whisk together the oil, eggs, brown sugar, granulated sugar, applesauce, and vanilla extract until fully combined. Add the grated carrots into the wet ingredients and mix until well combined.

  • Pour the wet ingredients into the dry ingredients and mix with a whisk or rubber spatula until just combined, making sure not to over mix the batter.

  • Coat the two sides of a waffle iron with non-stick cooking spray, and heat. Working one-by-one, pour enough batter into your iron to make a waffle. Cook until done through but not overly browned. Transfer onto a wire rack to cool. Repeat until you have 4-5 waffles to stack.

For the Icing:

  • Place cream cheese in a medium bowl and using a hand or stand mixer, beat until smooth. Add the butter and mix until well combined. Add the vanilla extract and the powdered sugar a little at a time, until fully combined and creamy.

Assembly:

  • Choose your serving plate and place the first waffle in the center. Add a generous amount of icing to the top of the waffle and spread to the edges, place another waffle on top, and spread more icing on it. Repeat until you have the desired number of waffles, and height of cake.

  • Do not ice the top waffle - instead, place a dollop of icing in the center and garnish the stack with flowers (or whatever your creative spirit directs you to do) and sprinkle with powdered sugar!

It was recommended to us that the cake be allowed to absorb the moisture from the icing for at least 24 hours (or longer) before eating. This one was baked on a Friday, then garnished with edible Nasturtium blossoms, and enjoyed on Monday. It was DELICIOUS!!!

What flavor combinations might you try? I’m thinking banana or zucchini bread would also be good with the cream cheese icing, or maybe lemon cake with butter cream? Let me know if you try this and share your ideas of different flavors with me!

Hi-Octane Breakfast Muffins

muffin.jpg

This breakfast muffin recipe comes from my friend, Chris, a teacher who needs to fuel up before she starts her day in the classroom. Her hubby, a hard-working construction manager, says they keep him satisfied all morning long. We can all use that kind of fulfillment!

Little muffins packed full of healthful ingredients; seeds, nuts, fruits and veggies, these are truly hi-octane!

There are a LOT of ingredients, so I think it would be a fun recipe to try out with an equally busy friend or neighbor. Shop together and split the cost of the ingredients, then spend a fun afternoon or evening mixing and baking up your healthful breakfast bites for the days (or weeks) ahead.

With so many bodies under my roof, I’d double or triple the recipe, and think about freezing them for those mornings I can’t make breakfast. I say THINK because I know they’d be gone in a flash, even before they got to the freezer!

These are tasty, with the perfect mix of sweet and savory, and the right combo of soft and chewy. Enjoy!!

Ingredients:

thumbnail_Facetune_22-02-2019-10-25-34.jpg
  • 2 cups multi-grain flour

  • 3/4 cup sugar

  • 1 tbsp cinnamon

  • 2 tsp baking powder

  • 1/2 tsp salt

  • 1/2 cup shredded coconut

  • 1 1/2 - 2 cup dried fruit bits

    • ( Choose 3-4 of your favorites and use a half cup of each: raisins, craisins, dried blueberries, cherries, apricots, dates, figs, etc.)

  • 2 cups carrots, grated

  • 3/4 cup low-sugar apple sauce ( or one medium apple, shredded)

  • 1/2 cup sunflower seeds

  • 1/2 cup pumpkin seeds

  • 1/4 cup chia seeds

  • 1/4 cup hemp seeds

  • 3 eggs

  • 2/3 cup coconut oil (vegetable or olive oil also work)

  • 1 tsp vanilla

Directions:

  1. Preheat oven to 350 degrees.

  2. In a large bowl, combine flour, sugar, cinnamon, baking powder and salt. Mix together.

  3. Add all the dried fruit, coconut, seeds, carrots and applesauce. Stir well to combine mixture.

  4. In a separate bowl, whisk the eggs with coconut oil and vanilla extract.

  5. Add the egg and oil combination to the dry mixture in the large bowl and stir to combine well so that all ingredients are evenly mixed.

  6. Spray about 12 standard cupcake tins or about 16 smaller muffin tins with non-stick cooking spray, or use paper liners. Fill to heaping.

  7. Bake at 350 for 30-35 minutes, until tops are browned well.

Have one or two for breakfast and start your day off on the right foot, fully fueled, for what’s to come, with these hi-octane muffins!

Game Day (Any Day) Pretzel Rolls

Pretzel Buns.jpg

A batch of delicious, fluffy, salty topped, pretzel rolls recently made their way into the studio kitchen/break room.

If there are pillows in heaven, they’re made from pretzel rolls… well, maybe not pillows, the tops are rather firm, perhaps stadium cushions then? Yes, stadium cushions in heaven are definitely made of pretzel rolls. lol.

So add these pretzel rolls to your offensive line-up for January play-off games and well beyond. They’ll go perfectly with any soup, chili, or stew, next to a leafy green salad, and paired with innumerable main dishes.

Don’t let the three stages of directions for the rolls daunt your enthusiasm, it’s a relatively easy process, but a written explanation can seem a bit overly-involved. It’s not.

Have fun and enjoy!

Ingredients:

  • 3 3/4 cups plus 1 tablespoon flour

  • 1 envelope (1/4 ounce) fact-acting yeast

  • 2 teaspoons salt

  • 1 1/4 cups lukewarm water

  • 3 tablespoons unsalted butter, melted

  • 3 tablespoons baking soda

  • coarse sea salt

Directions:

1st Stage:

  1. Combine the flour, yeast and salt in a large bowl.

  2. In a medium bowl, whisk together the warm water and melted, cooled, butter. Add to the flour mixture and mix with the dough hooks until well combined. If dough is too sticky, add more flour. Transfer the dough to a work surface kneading and punching-down until a smooth and elastic ball of dough.

  3. Place the dough back in the bowl, cover with a tea towel, and let rise in a warm place, or 100°F (35°C) warm oven, for 60 minutes until doubled in size.

  4. When the dough has doubled, punch it down, return to work surface, and knead for about 30 seconds.

  5. Divide dough into 10 equal (roughly 3-ounce) portions. Dust your hands with flour, roll dough for about 10 seconds until round and firm. This process creates surface tension and prevents the buns from becoming flat. Continue with the remaining dough, then cover with a tea towel and let rise in a warm place for about 20 minutes or until puffy.

  6. Preheat the oven to 425°F and line 2 baking sheets with parchment paper.

2nd Stage:

  1. In a large wide pot, bring 4¼ cups of water and baking soda to a boil. (Careful, it will foam up!) With a slotted spoon or ladle, slip two rolls into the boiling water and cook for 30 seconds, turn them over, and cook for another 30 seconds. Make sure they are not sticking to the bottom!

  2. Transfer the rolls to the lined baking sheets, score the tops, and sprinkle with coarse sea salt.

  3. Repeat for all rolls, then place them onto baking sheets.

3rd Stage:

  1. Bake, one sheet at a time, for about 15 minutes or until golden brown.

  2. Eat warm with butter, or store in a sealed bag or container for up to one week.

Pasta with Gorgonzola Cheese and Roasted Cauliflower

Gorgonzola Cauliflower Pasta.jpg

My nephew, Dalton (sister’s son), and niece, Laurel, (brother’s daughter), got together on Christmas eve and cooked up this “boujee” (their description!) version of my favorite dish - mac’n cheese.

Tender roasted cauliflower florets, Gorgonzola cheese, and the organic pasta they used, sets this apart from my typical elbow macaroni and cheddar dish, and make it special enough to serve at any dinner party of distinction. It’s versatile enough to use as a vegetarian main, or a side. (Perhaps to a halibut filet?)

Dalton and Laurel, a very Cousin Christmas!

Dalton and Laurel, a very Cousin Christmas!

Ingredients:

  • 1 head cauliflower, cut into small florets (less than an inch)

  • ¼ cup olive oil

  • ¾ teaspoon

  • freshly ground black pepper

  • 1 large leeks, halved and thinly sliced

  • 2 cloves garlic, thinly sliced

  • 8 ounces pasta like farfalle, bowtie, or fusilli

  • 3 tablespoons unsalted butter, cubed

  • 6 ounces Gorgonzola cheese, crumbled

  • chives for serving

Directions:

  1. Pre-heat oven to 425 degrees.

  2. In a large bowl, toss cauliflower, leeks, and garlic with olive oil, salt and 3-4 twists of freshly ground black pepper. Spread in a single layer onto a baking sheet or roulade pan and bake for about 35-40 minutes until cauliflower is tender and all veggies are caramelized.

  3. Cook pasta in large stock pot of salted boiling water - remove from heat just BEFORE it is al dente. Remove about 1 cup of the water - set aside, then drain the pot.

  4. Return the pasta to the pot, add the butter, Gorgonzola, a few more twists of the black pepper and 1/2 cup pasta water. Stir thoroughly until cheese is melted and evenly distributed.

  5. Add the roasted florets. leeks, and garlic to the pasta, then season with additional salt and pepper (if desired). If it is too dry, add more of the reserved pasta water.

  6. Dish into shallow serving bowls and garnish with chopped chives. Serve it up warm and delicious!

After carefully taste-testing and much discussion, our two burgeoning chefs decided it could be made even a little more extra by adding crab or lobster to the mix. I have to agree.

Cheesy Jalepeño Loaf

Jalepeno Cheese Bread.jpg

Fall is in the air, in fact, we tried to have a BBQ at the studio recently and even though the sun was shining brightly, the wind was from the north and so cold we picked up our plates and headed in to eat in the dining room!

I can't think of a better way to eat my way through this transitional time that with a mix of fresh veggies and fruits from the garden and some warm comfort foods like soups. Paired with those items, there can be nothing better than a thick slice of this dense cheesy bread.

Made with a beer batter base, and incorporating a little spice (not too much) with jalepeño peppers, it's just the ticket to a tailgater, an office potluck, or your next family meal.

It's "Steve Made" of course, so you know it's been tried and tested.  Here ya go!

Ingredients:

  • 3 cups all-purpose flour
  • 3 tablespoons baking powder
  • 1 teaspoon garlic salt
  • 1 teaspoon granulated sugar
  • 1/2 cup packed shredded cheddar cheese
  • 1/2 cup packed shredded pepper jack cheese
  • 1/4 cup pickled jalepeño peppers, chopped
  • 2 tablespoons green onion (green part), chopped
  • 12 ounces of beer 
  • 1/3 cup unsalted butter, melted, plus extra for greasing


Directions: 

1. Preheat oven to 375°F.
2. Grease a 9 x 5 bread loaf pan with butter.
3. Whisk together the flour, baking powder, garlic salt, and sugar in a large bowl.
4. Add the cheddar and pepper jack cheeses, jalepeños, and green onion, stir until combined.
5. Add beer to mixture, using a spatula stir until combined and batter is wet.
6. Transfer the batter to the greased loaf pan. Use the spatula to level the top.
7. Add the melted butter to the top of the batter, making sure to cover the entire top of the batter.
8. Bake for 1 hour, or until a knife inserted in the middle of bread comes out clean.
9. Remove bread pan from oven to a wire rack and let cool for 10 minutes. Then remove bread from loaf pan and let cool on wire rack for 5 more minutes.


Mmmmm. Thanks Steve!

New "Can't Live Without" | Copper Chef All-around square pan

New "Can't Live Without" | Copper Chef All-around square pan

Copper Chef was supposed to be great on all cooking surfaces and in the oven, work as a rice-cooker, steamer, roasting pan, stock-pot, wok, and baking dish. It's extra deep sides were said to hold 25% more food than most round pans. It's non-stick (no butter or oils, so heart-healthy) and a cinch to clean-up.

Guess what? They were everything they were supposed to be!