Food

April Book Club | Eat Dessert First

EAT DESSERT FIRST


“Eat dessert first!” is a credo I live by.

I mean, if the occasion calls for dessert (and what occasion doesn’t?!) why wait until the end of the meal?

Elise Thomas seems to feel the same. The first section of her cookbook, “Eat Dessert First”, lists 15 recipes that include cookies, bars, cakes, pies, and other sweet treats. A very complete collection (135 more recipes!) of both sweet and savory offerings follow.

Elise is known for her famous signature gourmet cookies she first started baking in her home kitchen and quickly turned into a highly successful chain of bakeries, “Cookie Co.” Yes, they’re THAT good! But cookies isn’t all she knows… Her first cookbook contains delightful breakfasts and brunches, lovey lunch offerings, and delicious dinners, PLUS breads, soups, salads, and all the extras. It’s a one-stop experience for recipes that any novice cook or experienced meal-maker will treasure.

From fluffy sour cream pancakes, to wedding shower chicken pasta salad, to black beans burgers with chipotle sauce, you’re mouth will be watering and you’ll be making a long shopping list the first time you flip through the full-color glossy pages. The slow cooker ranch chicken baked potatoes look like something the kids and I could dig into after a day full of work, school and activities. But first, dessert!

Pick up your copy, and a few for friends here:
EAT DESSERT FIRST

Iced Lemon Loaf

Reprinted from 2022

I don’t find myself in a Starbucks drive-thru very often, but when I do, their lemon loaf is a temptation that’s difficult - correction - impossible to pass up! I love the dense moist crumb cake and the sweet bright icing!

My sister and nephew recently tried to recreate this lemony goodness in their kitchen, because apparently he loves this treat even more than I do. Their attempt turned out temptingly tasty and quite beautiful too!

Paired with a cup of Bigelow tea (might I suggest the Lemon & Echinacea?) you can’t find a more perfect spring-time mid-day pick-me-up (say that three times real fast!), or a more welcome offering at an Easter brunch table!

Here’s everything you need to make 2 full loaves, one for yourself and one to share!

Ingredients:

Loaf:

  • 3 cups all purpose flour

  • 1 teaspoon baking powder

  • 1/2 teaspoon baking soda

  • 1/2 teaspoon salt

  • 1 cup unsalted butter – softened

  • 2 cups granulated ugar

  • 6 large eggs

  • Zest of 2 large lemons

  • 4 Tablespoons of lemon juice (plus 2 more for icing)

  • 2 teaspoons vanilla extract

  • 2/3 cup sour cream

Icing:

  • 2 cups powdered sugar

  • 2 tablespoons lemon juice

  • 2 tablespoons milk or water

Directions:

To make the loaves

  1. Preheat oven to 350 degrees

  2. Grease and flour two standard bread loaf pans

  3. Whisk the dry ingredients together in a medium-sized bowl: flour, baking powder, baking soda and salt

  4. Now, in a large bowl, beat the softened butter and the sugar together until very well combined

  5. Add one egg at a time to the sugar and butter mix, then the vanilla, lemon zest and lemon juice

  6. Add the dry mixture to the wet mixture a little at a time, alternating with the sour cream while mixing on low speed.

  7. Once fully combined, pour half the mixture into one loaf pan, and repeat with the rest of the mixture into the second loaf pan. The batter will be somewhat thicker than a cake mix

  8. Bake for 45 - 55 minutes, until a toothpick inserted near center comes out clean

  9. Cool on wire racks.

For icing:

  1. Combine powdered sugar, lemon juice, and milk (or water) mixing well, to make icing.

  2. Ice loaves once cooled.

Slice, serve, and enjoy!


*Note - These lovely lemony loaves seem best enjoyed fresh. Left overs, though stored in a sealed baggie, became quite dry after just a few days.

** 2nd Note - My nephew solved the stale loaf issue by cutting the remaining slices into cubes, placing in a bowl, and covering with half-n-half, a la, old fashioned strawberry shortcake! He says he’ll always save a few slices to do this with from now on!

Meringue Cookies

Oh yum! It’s been a minute since I enjoyed these sweet, crisp, lighter-than-air treats, so it’s about time, doncha think?

Meringue cookies were once a staple at fancy little gatherings like wedding and baby showers, recitals and receptions. No wonder, they come together pretty quickly - if you don’t count the hour plus they need to spend in a warm oven - and go down very easily!

They contain no flour or nuts so good for those who are intolerant of gluten and tree nuts - a shame if one has egg allergies though - and (I’ve heard) have only about 25 calories per cookie, so not going to bust anyone’s diet or New Year’s resolution!

There’s a short list of ingredients. The only one you may not have in a reasonably stocked pantry is the cream of tartar, which is important to stablize the egg whites so you get nice peaks. Not a lot of recipes call for it these days, but it’s also used in home-made playdough, so kitchens with kiddos will find another use!

You’ll want to use a metal or glass bowl to whip the egg whites, making sure it is absolutely dry when you begin. Also, separate the yolks from the whites over one bowl then transfer to your mixing bowl, even a bit of egg yolk can wreak havoc on your meringue, and cause it not to set as firmly as needed.

This recipe calls for 4 egg whites, and fluffs up enough to pipe about 72 little clouds of yum.

Ingredients:

  • 4 egg whites - room temp

  • 1/2 teaspoon of Cream of Tartar

  • 1/2 teaspoon salt

  • 1 teaspoon vanilla (use clear for white meringues)

  • 1 cup granulated sugar

Directions:

  1. Preheat oven to 225 degrees F

  2. Line two baking trays with parchment paper (place a dollop of meringue under each before piping to hold in place.)

  3. Place room-temperature egg whites in a metal or glass mixing bowl, use whip attachment on stand or hand mixer to mix into a froth.

  4. Add Cream of Tartar and Salt to frothy eggs, continue whipping until soft peaks form.

  5. Add Vanilla to soft peak meringue, combine well.

  6. Begin adding sugar a little at a time to soft meringue, never adding more than the meringue can hold on the top (should not be heavy enough to sink) continue whipping and adding sugar until the cup is fully incorporated and the meringue is holding a stiff peak.

  7. Transfer meringue to piping bag with large star piping tip. Pipe in rows leaving a little space in between for air to circulate.

  8. Bake at 225 degrees for 1 hour. Leave meringues in place, turn off oven and allow to cool.

  9. Meringues should be crisp all the way through. Test. If they still have moisture in the middle, return to 200 degree oven until crisp throughout.

  10. Store in air-tight container until serving. (Meringues draw moisture and become chewy if left unsealed.)

You can also add flavors and colors! Try lemon or peppermint as the season or occasion calls for, or even dip your cooled meringues in chocolate. Mmmmmm.

Gobble It Up Cheeseball

CheeseTurkey.JPG

Republished from November 2018

My sis was cruising the internet the other day looking for some holiday party inspiration and found this fine not-so-feathered fella.

He's so cheesy! And completely nuts! In fact, he's gone crackers! (And that is how I humor myself friends...) So if you find this appetizer funny, and clever, and aren't worried about your teenagers groaning and rolling their eyes when you present him with a proud-as-a peacock (er, turkey) flourish. Then get your nutty cheese on as she did!

Ingredients:

  • Your favorite cheese ball recipe (There’s a recipe below if you don’t have one. Don’t be afraid to improvise and add/subtract spices and ingredients.)

  • Red, yellow, and orange bell pepper slices (the mini's do the trick!)

  • Pecan Halves

  • Almond Slices

  • Pumpkin Seeds

  • Crackers for tail feathers - oblong work best

  • Pepper Corns (or other edible "eyes".)


Directions:

  1. Make your cheese ball, wrap in plastic wrap, and refrigerate until firm.

  2. Remove from fridge, place on center of serving plate.

  3. Insert "tail feathers" in a wide fan - place a smaller number in front and in back of the wide row.

  4. Press Pecans in at the "shoulders" working down and toward the back.

  5. Press the sliced almonds in near the tail feathers.

  6. Press the pumpkin seeds in in front of the almonds.

  7. Cut a slice of the Orange Bell Pepper to form a "head and neck (experiment with this) and press into the front of the cheese ball.

  8. Cut a "wiggly" slice of Red Bell Pepper and "glue" to the neck with a bit of the cream cheese.

  9. Cut a tiny bit of Yellow Bell Pepper for the beak. Use the tip of a paring knife to poke a hole in the "head" and insert a bit for the beak.

  10. Find some "eyes." A bit of cracker is used h ere, but pepper corns would work too. “Glue” the eyes on with another little bit of cream cheese.

  11. Now, present that proud fine "bird" with a bowl of crackers and shake your tail feathers!!!

Cheese Ball Recipe

Ingredients:

  • 1 (8 oz) packages cream cheese, room temperature.

  • 3/4 cups finely shredded sharp cheddar cheese.

  • 1/2 cup shredded parmesan cheese

  • 1 tablespoon bacon bits.

  • 1 tablespoon chives, chopped.

  • 1/2 teaspoon seasoning salt

  • Pinch cayenne pepper

  • 1/2 teaspoon liquid smoke

Directions:

  1. Mix together all ingredients by hand, or using a mixer, in large bowl until well blended and an even consistency.

  2. Form into a ball inside the bowl.

  3. Wrap the ball in plastic wrap.

  4. Place in the refrigerator until firm (about 2-3 hours.) Use the freezer for 30 minutes if you rarely think ahead (like me.)

  5. Decorate your bird! OR

  6. Roll in almond slices and serve with a basket of crackers.

Spinach & Feta Orzo with Fresh Dill

IMG_8790.JPG

With the arrival of autumn my taste buds crave savory comfort foods. I’m always on the lookout for delicious new dishes that fit the season, aren’t so difficult to prepare, (that I spend twice as long making it than our time around the dinner table lasts) and will appeal to my kiddos.

This creamy orzo dish loaded with fresh spinach (rich in iron, vitamin K, vitamin A, vitamin C and folate, as well as being a good source of manganese, magnesium, and vitamin B2!) boasting of fall flavors like garlic and dill, is just the ticket!

The feta cheese makes it somewhat filling, while the lemon zest keeps it light enough to pair along side a salmon or chicken fillet, or even some pork tenderloin medallions.

This dish comes courtesy of my nephew Dalton, who loves to try new recipes and is happy enough to share those that delight with me, and I in turn, with you.

This recipe serves about 4. I triple it for my brood!

Enjoy!


Spinach & Feta Orzo with Fresh Dill

Ingredients:

  • 2 tablespoons unsalted butter

  • 4 scallions, trimmed and thinly sliced

  • 2 large garlic cloves, minced

  • 8 ounces spinach leaves (about 8 cups), coarsely chopped

  • 1 teaspoon kosher salt

  • 1 ¾ cups vegetable stock

  • 1 cup uncooked orzo pasta

  • zest of one lemon

  • ¾ cup crumbled feta cheese, plus a bit more for garnish

  • 1 cup chopped fresh dill

Directions:

  1. Melt butter in large skillet over medium heat. Add chopped garlic and scallions (reserving a bit of the green for garnish,) - cook until softened.

  2. Stir in chopped spinach and about 1/2 teaspoon salt. Cook, stirring occasionally, until spinach is wilted, (about 5 minutes.)

  3. Pour in stock and bring to a simmer.

  4. Add orzo, lemon zest, and another 1/2 teaspoon salt. Stir together well, then cover and simmer over medium-low heat until orzo is plump and most of the stock is absorbed, (10 to 15 minutes.)

  5. The last step is to stir in crumbled feta cheese and the chopped dill, then cover and cook for about another minute or two, so that the cheese begins to melt into the mixture.

  6. To serve, dish onto plates, garnish with reserved scallions and another sprinkle of feta cheese.


Garlic and Sumac Roasted Broccoli with Sweet Dates

Screen%2BShot%2B2020-11-02%2Bat%2B12.17.05%2BPM.jpg

From the Live Life Deliciously cookbook, by Tara Teaspoon - comes this tasty selection perfect as a Thanksgiving - or weeknight dinner - side; Garlic and Sumac Roasted Broccoli with Sweet Dates.

Kids and adults alike will absolutely gobble this up!

My sis is always the one to bring a big roasting pan of veggies to our holiday gatherings but perhaps I’ll do her proud by tossing this together and serving it up alongside that beautiful bird this year.

Garlic and Sumac Roasted Broccoli with Sweet Dates
4-6 servings
10 Minutes Hands-On / 20 Minutes Total Time

LLD.jpg

Ingredients:

  • 2 pounds broccoli

  • 3 tablespoons olive oii

  • 2 cloves garlic, thinly sliced

  • 1 teaspoon sumac

  • 1/4 teaspoon kosher salt

  • 1/2 teaspoon ground black pepper

  • 4-5 dates sliced crosswise on the bias

Directions:

  1. Heat oven to 450 degrees F. Place a rimmed baking sheet in the oven to heat while you prepare the broccoli.

  2. Cut broccoli into small florets, slicing large florets in half. (You’ll need 6-7 cups of florets.) In a large bowl, toss broccoli with olive oil, garlic, sumac, salt, and pepper.

  3. Carefully remove the hot pan from the oven and transfer the broccoli mixture to the baking sheet, using a rubber scraper to get all the goods bits out of the bowl.

  4. Return pan to the oven and roast broccoli until tender and a bit charred, about 15 minutes.

  5. Add dates and serve broccoli immediately.

For more information on Live Life Deliciously, and buy links to purchase your own, visit my Book Club blog HERE.

Delilah Logo.png

Kneaders Bakery & Cafe | October Book Club

Wow! Wow! Wow! Have I chosen the PERFECT book for my October Book Club!

Kneaders Bakery & Cafe: A Celebration of Our Recipes and Memories by Colleen Worthington.

This big, heavy, hard cover volume contains all the recipes you’ll need to see you through the coming months (including the holidays!) and beyond! So many delicious artisan and sweet breads, as well as the soups, sides, and salads you want to go with them! Then they add scrumptious sandwiches, dips, and desserts too. And if that weren’t enough, there’s a whole section on drinks and smoothies!

The recipes are accompanied by the most stunning full-page, color photographs that will make your tastebuds tingle just looking at them.

How does Turkey Curry Chowder sound on a cold winter’s eve? That’s one of the many soup recipes I’m looking forward to trying with and on my big brood! I’m sure it will be a hit, especially paired with the Kaiser Rolls (which we could also use for sandwiches or burger buns.) There are just so many intriguing ideas between the covers of this book!

“The story of Kneaders Bakery & Cafe began with Colleen and Gary Worthington baking traditional European bread in their kitchen. After mastering old-world bread-baking techniques and testing countless recipes, Colleen, Gary, and their growing team of bakers moved onto their signature artisan bread.

But bread is just the beginning. Kneaders is well-known for their mouth-watering soups, sandwiches, and breakfast as well as their delectable pies, cakes, and pastries. For the first time, home cooks have access to popular recipes such as Overnight Chunky Cinnamon French Toast, Artichoke Portobello Soup, and Blueberry Sour Cream Pie. Beautiful and appetizing photos accompany each recipe.

What began in Colleen Worthington’s kitchen a little more than twenty-five years ago has grown into a successful family-owned bakery and cafe business with time-tested, delicious recipes gathered in this one-of-a-kind cookbook.

Kneaders also has 48 restaurant locations.
Find the one closest to you here:
KNEADERS LOCATIONS

You’ll want your own copy of Kneaders Bakery & Cafe: A Celebration of Our Recipes and Memories of course and I suggest you waste no time before placing your order!

ORDER: Kneaders Bakery & Cafe


Sweet Treat | Fairy Bread

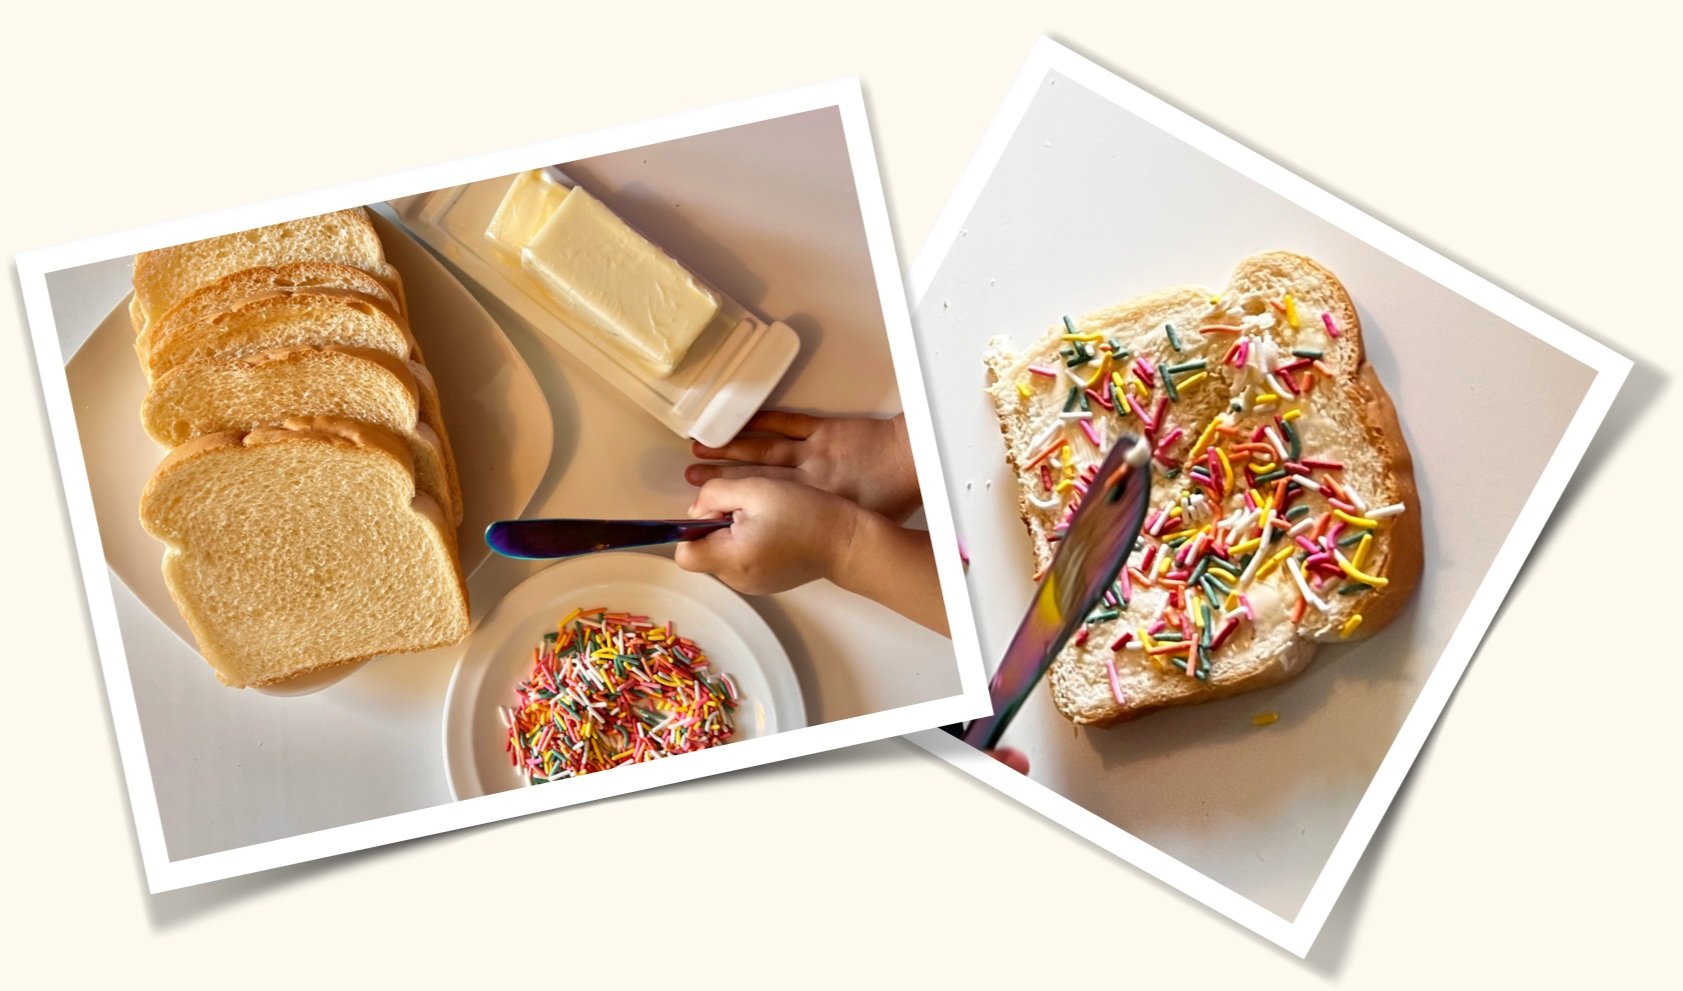
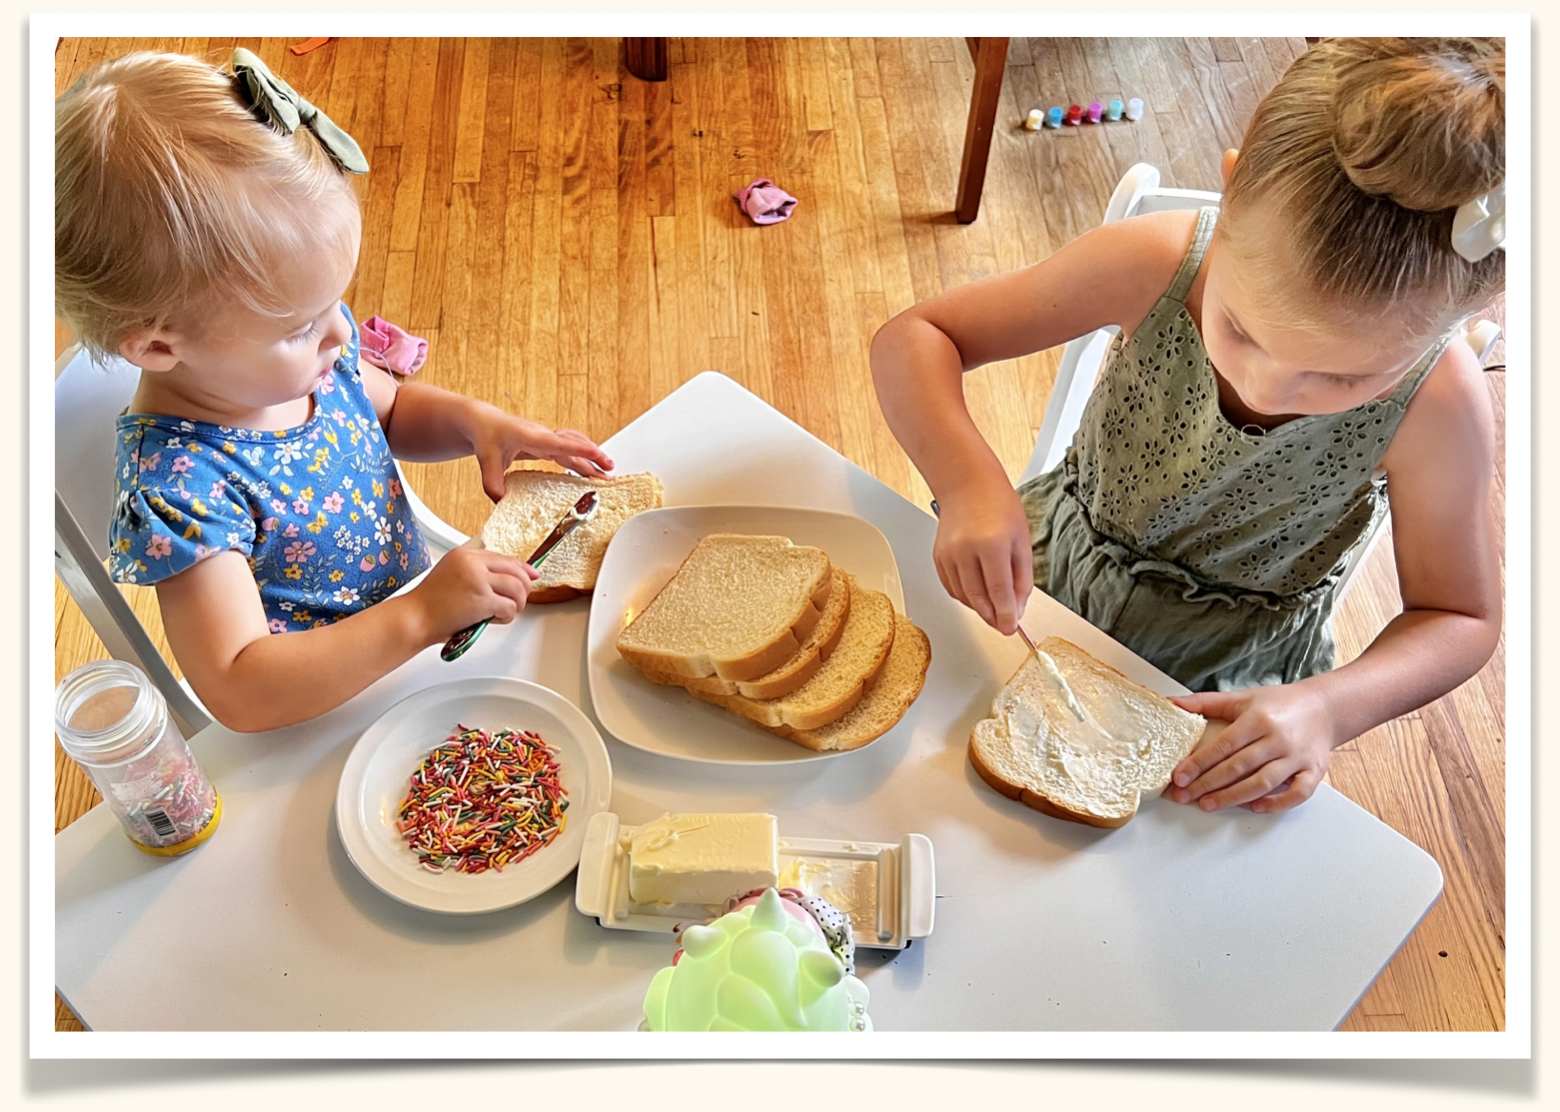
Fairy Bread, that Down-Under-Come-Northward treat, seems to be all over our social media feeds these days; white bread, slathered with a thick layer of butter, covered in rainbow sprinkles...

But did  you know it's origins are nearly one hundred years old?!

No? Neither did I until my Googling fingers got itchy and I did a little internet sleuthing. From Wikipedia:

"The first known reference to this dish as Fairy Bread was in the Hobart Mercury in April 1929. Referring to a party for child inmates of the Consumptive Sanitorium, the article proclaimed that "The children will start their party with fairy bread and butter and 100s and 1,000s, and cakes, tarts, and home-made cakes..."

The origin of the term is not known, but it may come from the poem 'Fairy Bread' in Robert Louis Stevenson's A Child's Garden of Verses published in 1885, and had been used for a number of different food items before the current usage.”

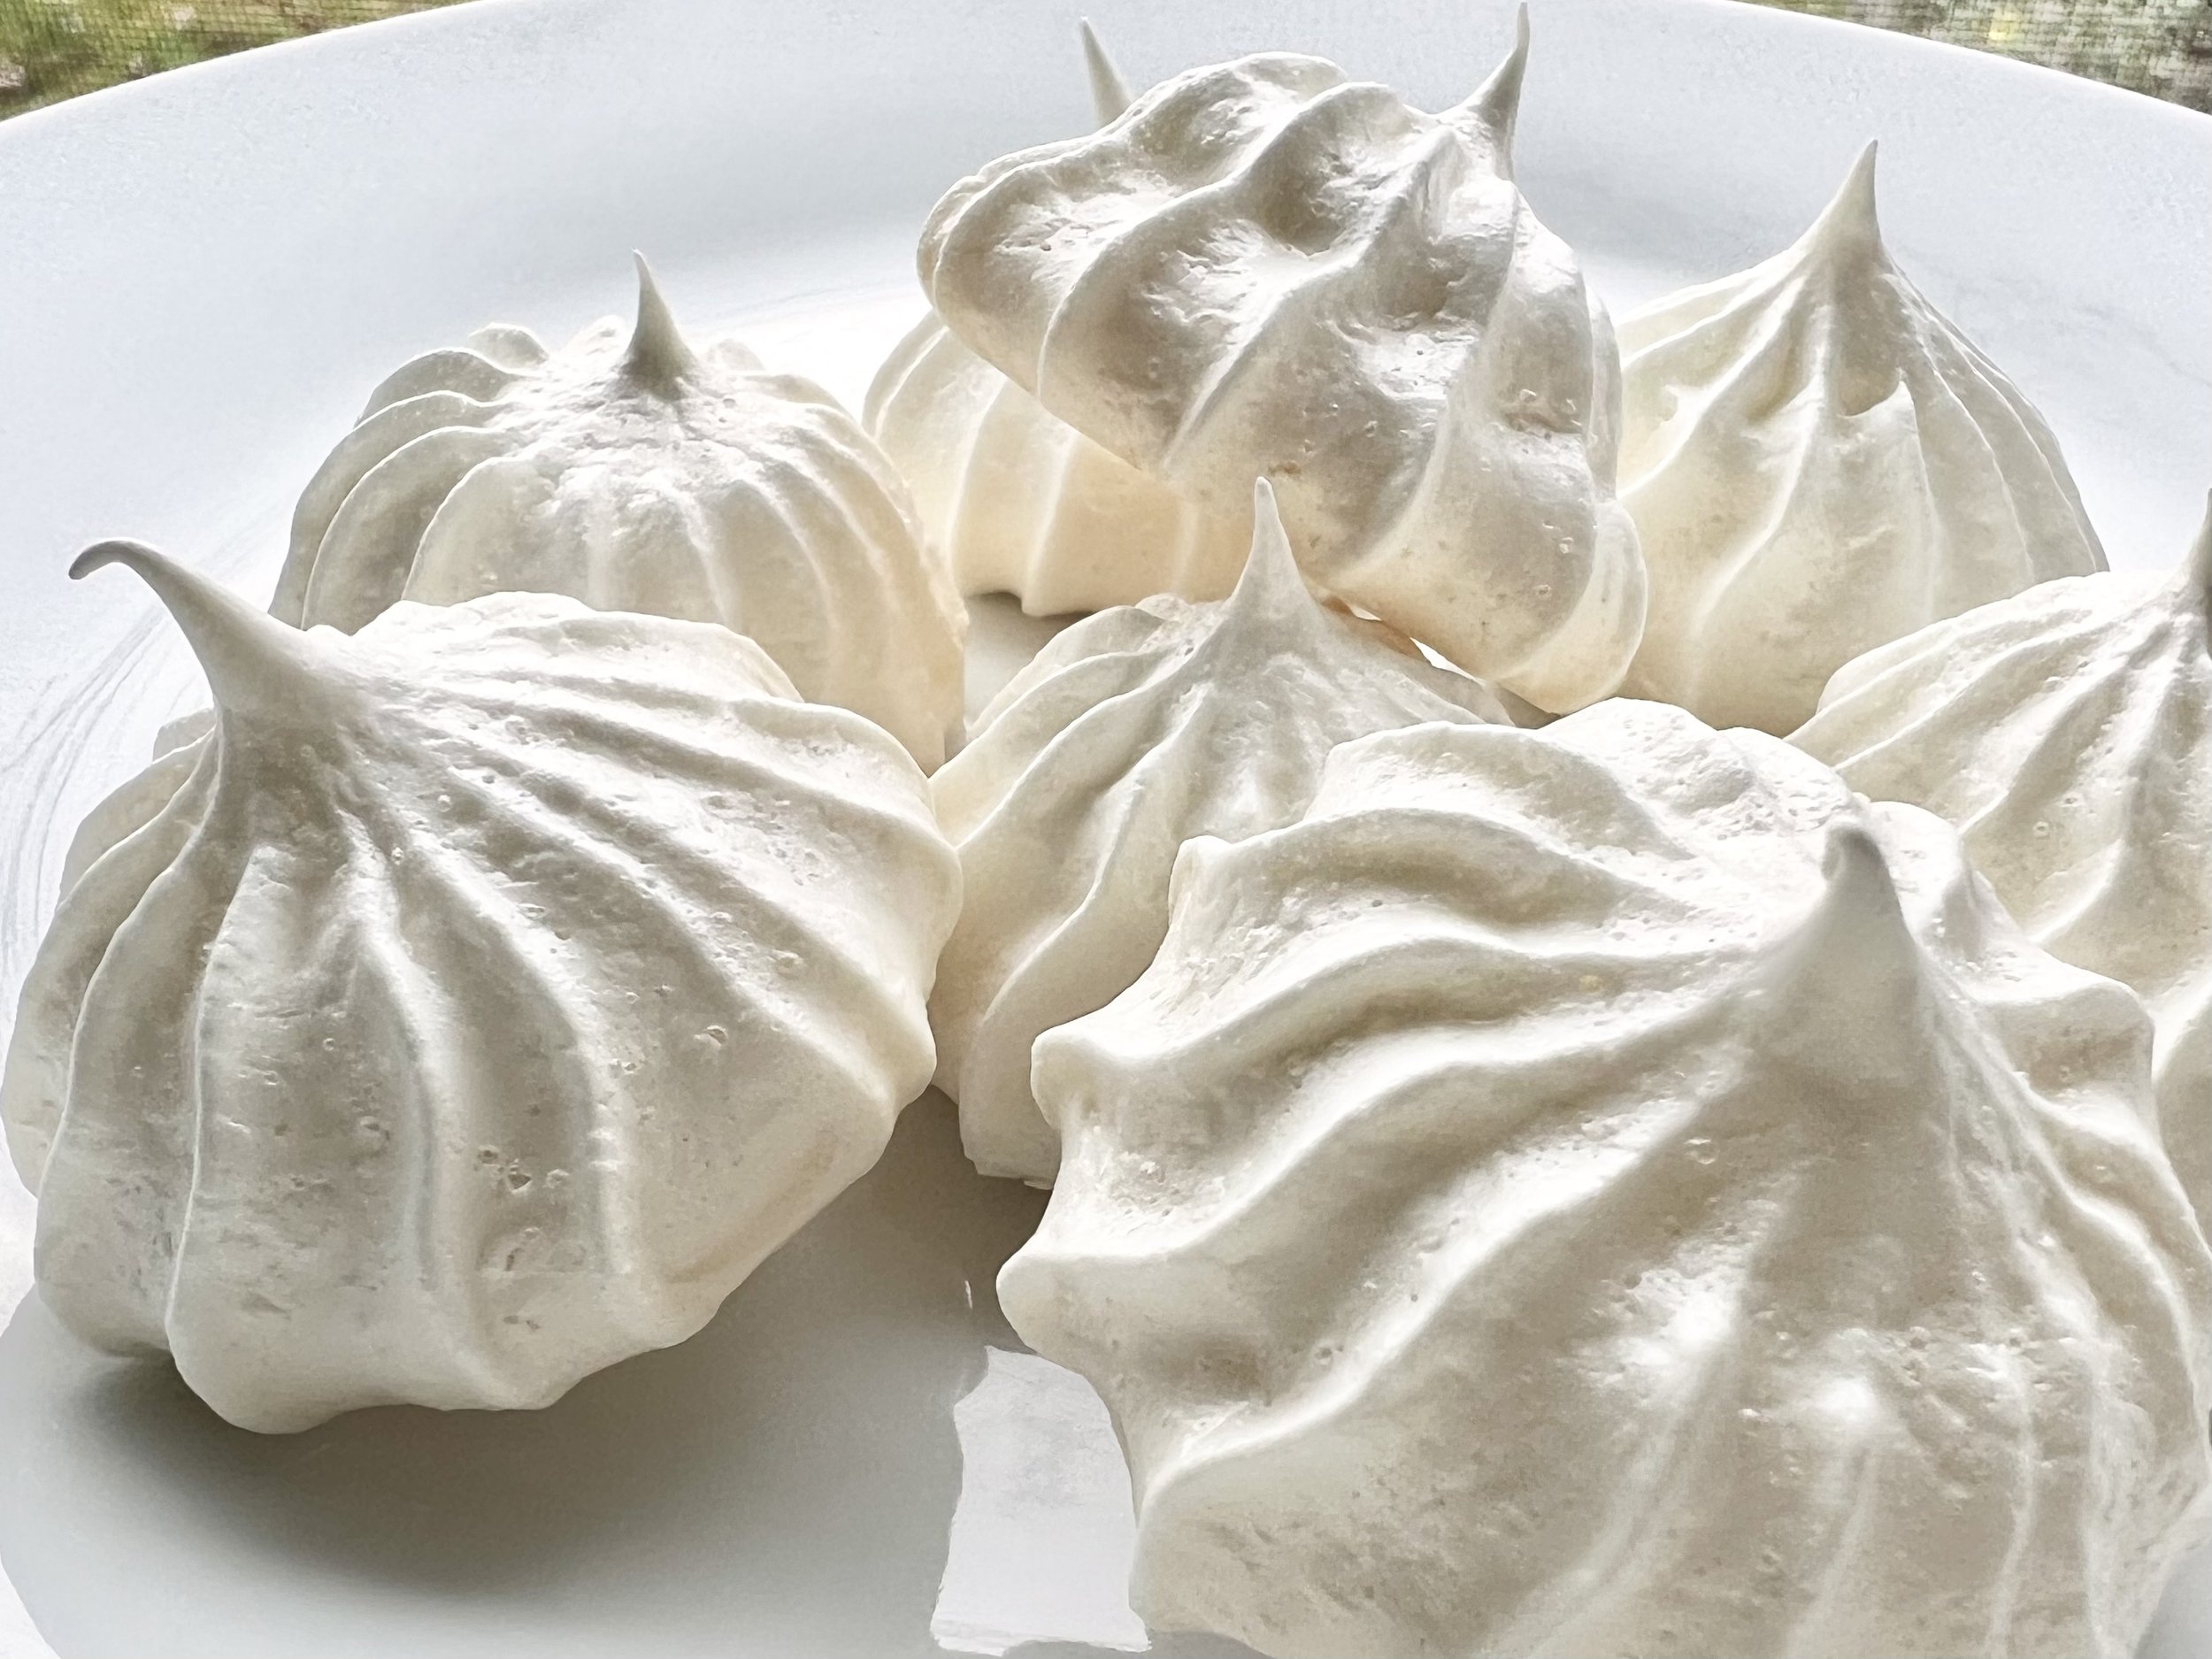
Sprinkles have a culinary moniker some of us may remember from our childhood, nonpareils. (Look up that word and it's a little confusing as to why it's used for little candy bits.) I remember my mother’s baking cupboard had a container of shiny round silver candies labeled nonpareils - they were used sparingly and we were always warned not to eat them, because although “edible” they’d probably break a tooth! Rainbow sprinkles are a favorite with children, and a peak at any baking aisle shows they come in all kinds of shapes, flavors, and sizes. ( A lot like the people who enjoy them!)

Other countries have different terms for them. In Australia and New Zealand, where Fairy Bread hails, for  example, they're called "Hundreds & Thousands."  And in Holland, they're "Hagelslag" (hail storm).  In fact, the Dutch have their own version of Fairy Bread that also originated way back in the 1920's. It’s basically the same, a slice of bread — though a denser country bread is typically used — coated with butter, and liberally sprinkled with chocolate hagelslag.

My granddaughters demonstrating that half the fun is making it themselves!

My readings also tell me that hagelslag is a bit different than our American sprinkles. They are larger and the chocolate variety used in this tasty example, according to The Spruce Eats, must contain at least 32 percent cocoa. I don’t think you’ll find the same to be true here.

… and the rest of the fun comes from eating it!

Does any of this sound remotely yummy to you? Well, kids LOVE it! And because I know I'll get a lot of backlash if I were to ever recommend it as a super easy, novel, after-school-treat, I won't do that.

(But you know, what happens in your kitchen with your kiddos is between you and their dentist!)


Come up here, O dusty feet!
Here is fairy bread to eat.
Here in my retiring room,
Children, you may dine
On the golden smell of broom
And the shade of pine;
And when you have eaten well,
Fairy stories hear and tell.

~ RLS


Not That Fancy | September Book Club

Anyone that knows me knows that I’m not that fancy. Really. And apparently neither is one of my biggest inspirations, Ms. Reba McEntire.

Her new book, “Not That Fancy, Simply Lessons on Living, Loving, Eating, and Dusting Off Your Boots” tells it like it is.

Plain. Simple. And down to earth. Just like Reba… with some amazing talent, hard work, and tenacity thrown into the mix!

The best things in life are really not that fancy. This photo-driven book featuring all-things-Reba invites you to get back to the basics of life: fun, food, friends, and family. In her first book in over two decades, actress and country music legend Reba McEntire takes you behind the scenes and shares the stories, recipes, and Oklahoma-style truths that guide her life.

“Not That Fancy“ includes:

  • Nearly 200 photographs from Reba’s childhood, career, and personal life—many of which are straight from Reba’s phone

  • Never-before-told stories from rodeoing with her family to pranks with Brooks & Dunn to falling in love over a plate of tater tots

  • Behind-the-scenes anecdotes from her music and acting career, with inspiration on how to follow your passion, trust your gut, and take a chance on yourself

  • More than 60 recipes of appetizers, mains, sides, desserts, and cocktails from Reba’s personal kitchen, from friends and family, and from her restaurant, Reba’s Place

  • Lighthearted lifestyle tips on how to achieve Reba’s signature hairstyle, plan a down-to-earth date night, throw an effortless dinner party, and more.

    WATCH the behind the scenes SNEAK PEAK

This heavy, hard bound volume is as beautiful as Reba herself. It’s going to look gorgeous on your coffee table right next to a little autumn decor, begging to be opened and read.

It’s available on October 10, so pre-order yours now so you have it in hand to lend all the fall inspo you need for recipes, relationships, and realizing your self-worth!

 Pre-Order HERE


Melon Prosciutto Skewers

Summer is a time for backyard parties! You don’t even need to be celebrating anything more specific than the opportunity to gather outside under cloudless skies!

The next time you’re asked to bring something to share, consider these little tastebud tantalizers.

The sweet/salty combination will disappear so quickly, you’d think they were held together by a magic wand instead of a skewer!

Ingredients:

  • 10 small wooden skewers

  • 20 melon balls (or 20 cubes of melon) (about 1/2 of a cantaloupe)

  • 10 fresh basil leaves

  • 10 balls or cubes of fresh mozzarella cheese

  • 10 strips of prosciutto

  • * Balsamic Glaze for drizzling.

Directions:

  1. Cut melon in half, discard pulp and seeds, use melon baller to make 20 balls.

  2. Cut prosciutto in half length-wise to double the number of strips.

  3. Rinse fresh basil springs.

  4. Thread onto skewers in order of melon, basil, mozzarella, prosciutto, melon.

  5. Drizzle with balsamic glaze.

  6. Serve.

* Balsamic reduction/glaze is easily made by combining equal measures of Balsamic Vinegar and Honey. Heat over medium until mixture is reduced by half. Allow to cool then drizzle over skewers. (1/3 cup each is plenty for 10 skewers.)


Now that I’ve laid it all out for you, I’m going to pose a question… How delicious do you think this would be as a salad?

I’d make the melon smaller, by cutting the balls in half (or making smaller cubes), halving the fresh mozzarella, and tearing both the basil leaves and the prosciutto into bite sized pieces then combining. A drizzle of the reduced balsamic glaze just before serving sounds divine to me!

However you made it, I hope you’ll try this spectacular combination, it’s super yummy as well as being light enough for a perfect summer appetizer!


NNNNNanaimo Bars!

In the Pacific Northwest, the delicious Nanaimo Bar (so named for the city in neighboring British Columbia, Canada) is somewhat of a holiday staple.

It is three distinctly different layers of flavors and textures that melt in your mouth and make you think you’ve visited nirvana.

This lovely no-bake treat does require refrigeration lest it lose it’s layers and become a gooey lump (probably be just as delicious!) And although it usually makes its appearance in the winter months, someone had the brilliant idea of bringing it out at a recent garden party and sharing it as a cool but decadent delight in the heat of the summer; a move I wholeheartedly applaud and encourage you to copy!

The addition of sea salt sprinkled on the top layer made these mini morsels next level! Here’s how its done:

Ingredients:

Layer 1:

  • 1 stick (1/2 cup) butter, softened

  • 5 tablespoons unsweetened cocoa powder

  • ¼ cup white sugar

  • 1 egg, beaten

  • 1 ¾ cups graham cracker crumbs

  • 1 cup shredded coconut

  • ½ cup finely chopped almonds (Optional)

Layer 2:

  • 1 stick (1/2 cup) butter, softened

  • 3 tablespoons heavy cream

  • 2 tablespoons instant vanilla pudding mix

  • 2 cups powdered sugar

Layer 3:

  • 1 cup (about 6 oz or 1/2 bag) semisweet chocolate chips

  • 4 tablespoons butter

  • Shredded coconut, nuts, and sea salt for garnish


Directions:

Clear enough room in your refrigerator to hold an 8x8” (or similar) baking dish

Layer 1: In the top of a double boiler, melt 1 stick of butter, mixing in cocoa powder and sugar. Beat in the egg. Remove from heat and combine with the crushed Graham crackers, shredded coconut, and nuts. Press the mixture into the bottom of your 8x8 baking dish.

Layer 2: In a large mixing bowl, beat together butter, heavy cream, and vanilla pudding mix. Add the powdered sugar, beat until smooth, and spread the mixture over the bottom layer. Place in refrigerator.

Layer 3: Place chocolate chips and butter in a microwavable bowl. Heat 15 seconds at a time, stirring in between and allowing the chocolate to melt slowly. Spread over Layer 2. Sprinkle tops with your choice of crushed nuts, shredded coconut, and for some added zip, a little bit of sea salt. Place back into refrigerator.

When set, cut into bars or squares. Serve chilled. Your guests (or family, or office mates) will love you!


Red, White, and Blueberry Beet Salad

thumbnail_Facetune.jpg

Reprinted from July 2019

Here’s a fun, festive, 4th of July salad for your holiday table. My sister made this one up just for the occasion (and because she knows I LOVE beets, even if she doesn’t!)

It calls for 4 very basic ingredients as well as a basic vinaigrette dressing made with red-wine vinegar. You can whisk one up yourself, or use a bottled one you’ve purchased, whichever get’s the job done to your satisfaction and gets you out of the kitchen and back into the celebration as quickly as possible.

You’ll wow your guests (or your hosts) when you place this on the banquet table!

Red, White, and Blueberry Beet Salad

Ingredients:

  • 5-6 large beets, peeled, cooked (you may boil or roast - your choice), cooled, and cubed

  • 2 pints of blueberries, washed and drained

  • 6-8 ounces feta cheese, crumbled

  • a bed of baby spinach

For the dressing:

  • ½ cup olive oil

  • 4 tablespoons red wine vinegar

  • 1 tablespoon Dijon mustard

  • 1 tablespoon honey or agave syrup

  • 2 medium cloves garlic, pressed or minced

  • ¼ teaspoon fine kosher salt, to taste

  • Freshly ground black pepper, to taste

Directions:

  1. Make the vinaigrette dressing:

    1. In a liquid measuring cup or bowl, combine all of the ingredients except oil. Stir well with a small whisk.

    2. Drop a single drop of oil into the mixture and whisk briskly, add another drop and continue to whisk, then add remaining oil in a stream, continuing to whisk until well blended.

    3. Taste, and adjust as necessary.

  2. Place cooked cubed beets in large bowl, add blueberries, pour viniagrette over top and mix well.

  3. Place baby spinach leaves on serving platter.

  4. Layer dressed beets and blueberries over the top of spinach, then sprinkle liberally with crumbled feta cheese.

  5. Refrigerate until serving.

Enjoy this salad, bursting with red, white, and blue flavor, as we celebrate our great nation’s birthday! I hope your 4th full of your favorite ingredients, and mixes up to be a happy and safe holiday!

Freedom Fudge

Screen Shot 2021-07-02 at 7.43.19 AM.png

Reprinted from June 2021

Am I the only one that gets a hankering for “out of season” foods? I think not. So when a friend said they were making “Freedom Fudge” to share at an Independence Day gathering, my eyes lit up and my mouth watered.

And besides, as someone who grew up in a coastal town, summer tourism and fudge shops are pretty synonymous. But you don’t see fudge recipes circulating much in the summer time, they usually show up in our feeds around Thanksgiving. I mean to change that with this post!

This quick-fudge recipe, that makes a plate-full of rich little morsels in a jiffy, calls for only 3 ingredients.

It’s so quick and easy, you can make them any day of the year and the recipients will almost certainly erupt in smiles of gratitude.

My friend dressed them up for the 4th of July by drizzling melted white chocolate over the top and adding some red, white, and blue sprinkles. That seems like a lot of work to me, but if you want to, go ahead!

Ingredients:

  • 1 12oz package semi-sweet chocolate chips

  • 1 14oz can sweetened condensed milk

  • 2 Tablespoons unsalted butter


Directions:

  1. Place sweetened condensed milk and butter in saucepan and heat on stovetop on medium heat until butter is melted.

  2. Turn off heat and add chocolate chips, stirring until melted and mixed thoroughly.

  3. Pour into 8”x8” baking dish lined with waxed paper.

  4. Chill in refrigerator 3 hours or over night.

  5. Cut into squares and serve.


Double this recipe for a larger crowd and use a 9”x13” pan. Feelin’ nutty? Add half a cup chopped walnuts. Going soft? Toss in a cup of mini-marshmallows. Trying to lighten up? Substitute white chocolate chips….

Keep it simple, or make it a show-stopper, ‘cuz hey, it’s a free (and almost fully open) country!

Freedom Fudge; your fudge, your way. Any time of the year!

Delilah logo red.png


Red White & Blue - Berry Bites

Screen Shot 2020-06-29 at 12.09.09 PM.png

Reprinted from July 2020

President’s Day, Memorial Day, Flag Day, Independence Day, or Veteran’s Day… there are many designated holidays throughout the year that encourage us to celebrate the American Spirit. One way to do that is to serve up a little red, white, and blue on the buffet table.

I'm not quite sure that Red White & Blue - Berry Bites qualify as a "recipe" as much as it does as a "craft", but since it is definitely edible (very, deliciously edible) I'm filing under both categories.


Ingredients:

  • Red ripe strawberries, rinsed, stem on

  • White chocolate chips - melted

  • Blue sugar crystals

  • Waxed or parchment paper

Instructions:

  1. Take a sweet, red, beautiful strawberry, holding the stem end in your fingers, dip the tip - up to about 3/4  of the berry into melted white chocolate, then immediately dip it again - leaving a band of white - into blue sugar sprinkles. Place on parchment or waxed paper to "set".  Voila! 

Friend, and Point Hope Director, Jan, made some up with daughter Erin and grandkids; while she thought that perhaps they weren't as picture perfect as the ones from a magazine, there's no doubt a ton of fun and even more love went into their creations.

This is an uncomplicated but showy display of patriotic pride with a berry big blast of flavor! Have fun with it!

Cauliflower 'Faux-tato' Salad

Fauxtato+Salad.jpg

Reposted from June 2019:

My potato salad is famous (or perhaps infamous, not sure which…) and I’ll make it for any occasion; BBQ’s, birthdays, bar mitzvah’s… but (confession session) sometimes I crave a lighter dish.

Enter this delicious “faux-tato” salad made with steamed cauliflower florets - it’s so so tasty, but far lower in carbs. It’s got everything you want for a great picnic salad except all the starch. Go ahead, give it a try!

Ingredients:

  • 1 large head cauliflower, cut into florets

  • 1/2 cup bacon bits (about 6 rashers of bacon)

  • 1/2 c. sour cream

  • 1/4 c. mayonnaise

  • 1 tspn stone-ground mustard

  • 1 tbsp. dill pickle brine (vinegar or lemon juice work too!)

  • Salt and Pepper

  • 1 1/2 c.  cheddar cheese, shredded

  • 1/4 c. chives, chopped small

Directions:

  1. Add cauliflower florets to about 1” of boiling water in large pot or pan. Cover and allow to steam until tender - about 5 minutes. Remove from heat, drain, and cool. Set aside.

  2. Cook bacon rashers until crispy, turning to crisp each side. Drain on paper towels then break or chop into bits.

  3. Mix together, sour cream, mayonnaise, mustard, pickle brine (or vinegar or lemon juice) in a large bowl. Add the steamed and cooled cauliflower florets and gently stir to coat. Season with salt and pepper, then fold in bacon, cheddar, and chives. Serve warm or at room temperature.

Of course, like most of my recipes, they’re more suggestion than anything else. If you have a particular way you like to dress your potato salad, give it a try only use the cauliflower florets instead of starchy ‘taters.

I’m always interested in what you think - so tell me if you try this, any adjustments you might make to it, and most importantly, what was the cause of your gathering and celebration?! I’m nosy that way!

20-40-60 Minute Dinners | April Book Club

When daylight starts stretching into the evening hours, it’s time to celebrate! It’s also time to start doing all the things we forgot about during the winter months. Like gardening, Little League and Spring Soccer practices, and all kinds of other fun activities! But then the dinner hour sneaks up on us and all of a sudden we’re cruising through a drive-through groaning inwardly or outwardly…

That’s why I’ve chosen “20-40-60 Minute Dinners; Meals to Match The Time You Have” for my book club this month - to help take the anxiety around “what to fix for dinner?!” down a notch or two!

Arranged by the time it takes to prepare a meal, rather than alphabetically, author Kate Otterstrom, (who also, btw, is the creator of the Dinner in Real Time blog,) has put together a beautiful and oh-so-helpful cookbook full of meals to match the time you have to get them on the table! Kate is the busy mom of four, so you know that she’s got some practice at pulling together tasty and healthful meals in-between demanding schedules!

Anyone who finds themselves getting take-out far more often than they’d like will appreciate the abundance of fabulously simply ideas found between the pages of 20-40-60 Minute Dinners. I’ll be gifting a copy to one of my daughters, herself a mom of two active littles, because I know she’ll love the ideas it holds, and also because the recipes include gluten-free alternatives, which she must adhere to.

I appreciate how there’s nothing fussy about this cookbook, because delicious food that meet our dietary requirements does not have to be fussy! Even for folks like me, who’ve been at this dinner game for too many years to confess, will find some great reminders between its pages. For example, bagels with lox and cream cheese with a green salad? Yes! Perfect. A quick, filling, and fun dinner when you need to throw together something FAST. Kate suggests too, that served make-your-own bar style gets her kids more excited and up for trying new things like a sprinkling of capers. Note taken!

Here’s to a beautiful spring and summer and to getting dinner on the table, deliciously, in the time that you actually have, be it 20, 40, or 60 minutes!

Pick up your copy - and another for a gift - here: 20-40-60 Minute Dinners

Lemon Squares | Cookin' It with Kix


I think I have a thing for lemon bars. OK, I KNOW I have a thing for lemon bars.  As soon as I've discovered THE BEST recipe around, another comes along, and I love it just as much!  

If you think perhaps you do as well, try this recipe. You won't be disappointed!

Maybe it's the universal appeal of lemony lusciousness. Rarely, and I do mean rarely, does anyone turn away a lemon bar, when offered. Maybe it's the universal "season" of lemons  - yes, I know they ripen in the summer in climes where they are grown, but generally you can find them in abundance on your grocers aisle 12 months out of the year.

An’ maybe it's just cuz lemon bars are sooo darn good!

This recipe comes from Cookin' It with Kix my a book club pick from waaaay back in 2016. Of course, I tried it. Of course I loved them! I found the filling to be a perrrrfect consistency, probably because of the 4 eggs. (Any excuse I have to use more eggs around here!) 

Perfect for an Easter table or any early spring gathering!


Ingredients:

CRUST

  • 2 cups all-purpose flour

  • 1 cup powdered sugar

  • pinch of salt

  • 1 cup (2 sticks) unsalted butter, room temp.

FILLING

  • 4 eggs

  • 2 cups white sugar

  • 6 tablespoons all-purpose flour

  • 6 tablespoons freshly squeezed lemon juice

  • powdered sugar

Directions:

Preheat oven to 350 degrees

  1. Butter a 9x13 inch baking pan

  2. To prepare crust: Combine flour, powdered sugar and salt in large bowl. Cut in butter to make a crumbly mixture. Press teh mix into the buttered pan. Bake for 20 minutes or until lightly browned. Do not over cook!

  3. To prepare filling: Mix eggs, sugar, flour, and lemon joice. Pour over baked crust, bake for another 25 minutes. Sprinkle with powdered sugar when done. Cool.

  4. Cut into squares and serve.

Dutch Babies

When my kids or my brother’s kids visit our sister, their auntie, they always ask for Dutch Babies.

She’s been serving them these puffy golden treats for years. As children they were fascinated with the way they puff up so impressively in the oven, and deflate once removed.

They can be topped with all sorts of sweet concoctions, fresh fruits and berries in the summer time, apples and cinnamon in the winter, lemon curd in the spring… jams, jellies, or sometimes just more butter and powdered sugar. (Zack preferred them with chocolate chips, whipped cream, and chocolate syrup!)

She uses a very simple recipe that calls for 1/4 cup of milk and 1/4 cup of flour for every egg, adjusted for pan size, and lots and lots of butter. She advocates for a few more minutes in the oven than many recipes advise because folks in this family don’t appreciate the “custardy” taste or texture that others do. You do you.

She recently cooked up a batch and made them “fun size” in individual muffin tins. This would make a delightful Valentine's Day breakfast served with your sweetie’s favorite fruit toppings, more butter, powdered sugar and/or syrup. (Much as you would a Belgian Waffle.)

The serving pictured here is topped with raspberry jam and whipped cream. Mmmmm.

The quantities below will work for 12 muffin tins or a 9” pie dish.

Ingredients:

  • 3 large eggs

  • 3/4 cup milk

  • 3/4 cup flour

  • 1/2 cup (1 cube/ 24 teaspoons) of butter

Directions:

  1. Preheat oven to 400 degrees.

  2. Place 2 teaspoons of butter in the bottom of each muffin tin. Place in oven the last few minutes it is preheating until butter is melted and bubbling, but do not let it brown. Remove from oven.

  3. In a blender (a smoothie Bullet works well) combine eggs and milk, followed by flour added a 1/4 cup at a time.

  4. Pour batter over hot, melted butter, filling each cup about 1/2 full.

  5. Place in 400 degree oven and bake 15-20 minutes until puffed and a deep golden color.

  6. Remove from oven, top with favorite toppings, and serve.

    Notes:

    1. If using a 9x13 pan, use 5 eggs, 1 1/4 cup milk, 1 1/4 cup flour, and a full cube of butter cut into pieces.

    2. Serve alongside bacon, sausage or other protein. They are delicious but won’t take you to lunch time on their own.

    3. Fun fact. Yorkshire Pudding is made with the same batter, but “drippings” are used in place of butter and they are served with gravy, making them savory instead of a sweet side. Try both!

Delicious Gatherings | December Book Club

She’s done it again! Tara Teaspoon, author of “Live Life Deliciously”, has released a beautiful new cookbook, just in time for the holidays, “Delicious Gatherings, Recipes to Celebrate Together,” is available now!

This is another splendid offering from Tara, and just like her previous hard-bound volume, offers a multitude of delicious sides, mains, and deserts (with plenty of appetizers, dips, and breads to round it out) so you never again find yourself saying,“What in the world am I going to make?!” There are full-course menus for memorable gatherings (including breakfasts and brunches) that you are going to thank her for over and over!

After two years of distancing, we’ve all built up an appetite for togetherness and good eats! Tara Teaspoon, (real name, Tara Bench,) helps you sate both hungers with recipes for elevated everyday meals and special holidays, plus helpful tips and how-to’s. They say this cookbook aims to bring “joy, flair, and amazing taste” to all your get-togethers, and I wholeheartedly agree with the statement!

From Sunday suppers and weeknight family meals to elaborate buffets for bigger crowds and holiday celebrations, Tara’s recipes include delicious showstoppers and unique takes on comforting classics. I’m especially intrigued with the Roast Carrots with Lemon Feta Dip (yum!) and the fancy-looking (but relatively easy) Spinach and Artichoke Tarte Soleil featured on the cover.

One of the things that I really appreciate about Tara’s take on things is her encouragement to make each recipe your own, often providing suggestions for substitutions, and always with a “have at it!” attitude!

I hope you find yourself in the company of family and friends this holiday season, and hope you’ll find a seat at the table for Tara Teaspoon’s “Delicious Gatherings.”

Order your copy: DELICIOUS GATHERINGS

Roasted Butternut & Brussels Sprouts

I’ve been seeing so many delicious looking recipes combining roasted butternut squash with Brussels sprouts pop up in my social media feeds. I’ve even shared one to my Facebook page that looked particularly appealing (it included bow-tie pasta), but it wasn’t until my sister showed up to a family dinner with this side dish that I was able to try a fork-full, which of course led to several more fork-fulls!

It’s such a yummy combo and you can add or subtract a variety of things (like the pasta) to tailor it to your taste or the occasion. She opted to skip the pasta, because she knew there would be many other carb-loaded dishes. She also went with toasted pumpkin seeds because although pecans would work beautifully, my daughter (her neice) has a nut allergy and she wanted her to be able to enjoy it as much as anyone.

Here’s her tasty take on this year’s must-do side dish which included dried cranberries (c’raisins), feta cheese crumbles, toasted pumpkin seeds, and a honey-balsamic glaze:

Ingredients:

  • 1 butternut squash peeled, seeded, and trimmed into 1” cubes

  • 1-2 lbs Brussels sprouts, cleaned, trimmed and cut in half lengthwise

  • olive oil

  • kosher salt

  • 1/2 cup dried cranberries

  • 1/2 - 1 cup roasted pumpkin seeds

  • 1/2 cup (or more!) feta cheese crumbles

for the glaze:

  • 1/2 cup balsamic vinegar

  • 3 Tablespoons honey (you may also use maple syrup or brown sugar)

Directions:

  1. Toss butternut squash cubes in olive oil and a little kosher salt, then spread out on a baking sheet, being careful not to overcrowd. Roast for 20 minutes in a 400 degree oven.

  2. Do the same with the Brussels sprouts.

  3. While sprouts are roasting, prepare glaze by heating balsamic vinegar in small saucepan over medium-hight heat. Add honey, (or sweetener of choice) and heat through. When combination begins to bubble, turn the heat down to simmer until mixture has reduced by about half and has thickened. Take off heat and set aside.

  4. When the Brussels sprouts have roasted, remove to large bowl and toss with balsamic glaze.

  5. Add dried cranberries and mix well.

  6. The roasted butternut cubes will be soft so to prevent them from falling apart, allow to cool slightly, then fold gently into the glazed Brussels sprouts and cranberries.

  7. Sprinkle mixture with kosher salt to taste.

  8. Top with crumbled feta cheese.

  9. Add pumpkin seeds right before serving.

This dish is full of beautiful color, textures, and absolutely packed with flavor! It will be a welcome addition to any holiday table. Enjoy!